Blogengine.Net 2.5 has just been released and the following are some the features you can find on this new blogging tool:
- Upgraded to .NET 4.0
- Multiple Blogs in Single Installation
- Razor Theme support (Razor theme included, "Garland-Revisited")
- Converted Admin pages to Razor (Dashboard, Extensions, Themes)
- Install Themes from the BlogEngine.NET Gallery while in the BlogEngine.NET control panel.
- New language resource files for Estonian and Polish, and other translations updated.
- Upgraded to jQuery 1.5.2.
- Upgraded to latest version of tinyMCE WYSIWYG editor, v3.4.3.1.
- Numerous fixes and improvements.
If you want to test-drive this new version, the release candidate can be downloaded here final version can be downloaded here.
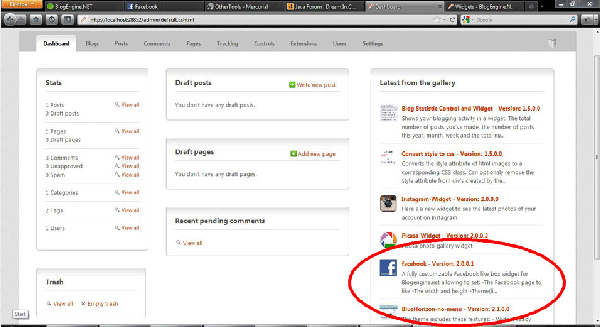
Looks promising, so yesterday I downloaded the latest branch to get a little preview, and what did I see?
My very own Facebook thingy into action! It was a nice feeling to see it there, but I wished I could contribute more. See I've been working in my top secret underground lab to add Facebook comments to Blogengine.net, and while just hacking it in there is relatively easy to do, making it so that others can easily use the code for themselves is a second. Partially because Facebook's API is kind of...dodgy. In the way that it requires some XML namespaces added to the html tag, which is in the theme.
That sounds like a nightmare to me, because it would mean every user needs to change his or hers theme manually. "Luckily" it seems it also works with some Javascript, and I want to test that a bit more and see if I can get it worked out into a extension or even added to the build. But it seems with all my assignments I won't make that for the 2.5 release but oh well...there will be other releases.
In the meantime I hope Facebook finds out a way of doing things that is both clean and html 5 compliant.

Yesterday I encountered the following question in the MSDN forums about calling a cross-domain WCF RESTful service from Chrome.
The problem with doing the above is because there is a cross-domain call to a WCF service. When you are using Chrome, the browser tries to find out if it can do the call by sending a cross-origin resource sharing (CORS) request, as explained in this article. In IE, you will most likely get a cross-domain exception.
After searching the web a bit, I found that the immediate solution is to change the supported HTTP method of the operation to “*”, and to add the special cross-origin headers to the outputted response, like so:
WebOperationContext.Current.OutgoingResponse.Headers.Add(
"Access-Control-Allow-Origin", "*"); WebOperationContext.Current.OutgoingResponse.Headers.Add( "Access-Control-Allow-Methods", "POST"); WebOperationContext.Current.OutgoingResponse.Headers.Add(
"Access-Control-Allow-Headers", "Content-Type, Accept");
There are two problems with this solution:
You need to repeat these lines in each of your service methods.
The service method is called twice, once for the “preflight” request (the request with the OPTIONS HTTP verb), and a second time for the invocation itself.
So I took the time and written a special endpoint behavior that can be attached to any webHttpBinding based endpoint.
The code does the following:
1. Every response message gets the “Access-Control-Allow-Origin” header with the value of “*”, to tell the client that the service allowed the request from the client.
2. If the client sends a request to the service with the verb OPTIONS (this is referred to as a “preflight” request), the service will automatically return a 200 (ok) response with the required headers: “Access-Control-Allow-Headers” and “Access-Control-Allow-Methods” (in addition to the allow-origin header). Clients that look for the “allow” headers in the response will then send the original required request to the service.
The benefits of using this behavior is:
The code that returns the message with the headers is located in the behavior itself – no need to place it in each service method.
The behavior catches the OPTIONS request, and does not require running the service method twice.
You do not need to change any part of your service contract or service implementation. The behavior is only needed to be applied using configuration.
To implement this behavior I used a message inspector that checks the request and changes the response, and an operation invoker that wraps the unhandled operation invoker. The custom operation invoker handles the OPTIONS message requests, which otherwise would have caused the service to return an error message (because no method is set to handle “Options” requests).
The endpoint behavior can be attached to the endpoint through configuration, like so:
<behaviors>
<endpointBehaviors>
<behavior name="webSupport">
<webHttp />
<CorsSupport />
</behavior>
</endpointBehaviors>
</behaviors>
<extensions>
<behaviorExtensions>
<add name="CorsSupport" type="WebHttpCors.CorsSupportBehaviorElement, WebHttpCors, Version=1.0.0.0, Culture=neutral, PublicKeyToken=null" />
</behaviorExtensions>
</extensions>
<services>
<service name="Service.JSonService">
<endpoint address="http://localhost:8080" behaviorConfiguration="webSupport” binding="webHttpBinding" contract="Service.IJSonService" />
</service>
</services>
Or, if you are using IIS to host your services, I also created a service host factory that creates a WebServiceHost and adds the behavior to every webHttpBinding based endpoint created by the host. To use it in your .svc file, just write something like this:
<%@ ServiceHost Language="C#" Debug="true" Service="Service.JSonService, Service" Factory="WebHttpCors.CorsWebServiceHostFactory, WebHttpCors" %>
To test the two hosts, open the webform1.aspx and change the target URL to access the IIS/self-hosted service.
Enjoy!
The ASP.NET pipeline allows HTTP modules to be plugged-in to a request and intercept or modify each individual request. Modules can be used for processes like caching, authentication etc. However a basic requirement for an HTTP module to function, is that it must be registered in your config file. This leads to editing the Web.Config whenever you have to add/remove modules. I hate fudging with my config file too often!
Not known to many developers, ASP.NET 4.0 provides the PreApplicationStartMethodAttribute which allows you to run code even before any app_start event gets fired or any dynamic compilation occurs (App_code).
So how do I register an HTTP Module at Runtime using PreApplicationStartMethodAttribute and DynamicModuleUtility.RegisterModule?
It’s a simple 3 process step!
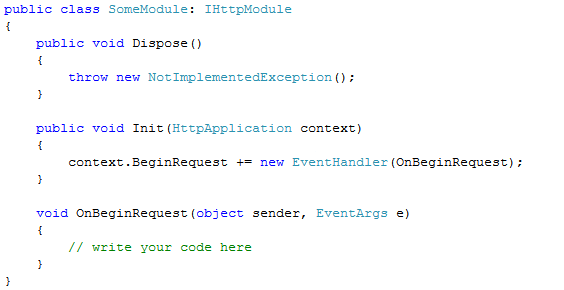
Step 1: Implement your Module. In the code shown below, we are implementing the IModule interface and subscribing to the BeginRequest event of the HttpApplication object. The OnBeginRequest method hooks up to the BeginRequest event.

Step 2: Register the Module dynamically using the DynamicModuleUtility.RegisterModule method. Write this code in the same class you created above

Step 3: The final step is to use the PreApplicationStartMethod attribute. Just add this attribute at the assembly level in the AssemblyInfo file or as shown below:
There you go! You have just registered an HTTP module into the ASP.NET pipeline without making any changes to web.config file.
