ASP.NET 4.0 Hosting & ASP.NET 4.5 Hosting BLOG

BLOG about ASP.NET 4.5 Hosting, ASP.NET 4.0 Hosting and .NET 4.5 Framework and its Capabilities

ASPHostCentral.com now offers IIS 8 Hosting on Windows Server 2012

clock September 27, 2012 10:28 by author Administrator

ASPHostCentral.com, the premier Windows and ASP.NET Hosting provider, proudly announces the availability of IIS8 Hosting on our most advanced Windows 2012 hosting platform. ASPHostCentral.com supports .NET Framework 4.5, so you can run apps built with ASP.NET 4.5, Visual Studio 2012, and Visual Studio Express 2012. We also support ASP.NET MVC 4, Silverlight 5, One-Click Publish and WebMatrix Hosting!

This IIS 8 service is bundled with our newest Windows Server 2012. Within Windows Server® 2012 you will find exciting innovations in areas of virtualization, networking, storage, user experience as well as an improved integration with Windows PowerShell® which takes scripting to a whole new level. This is quite possibly the most significant release of Windows Server® ever.

What is new in IIS 8.0 for Windows Server® 2012?

- FTP Logon Attempt Restrictions
- CPU Throttling: Sand-box for sites and applications
- Application Initialization Module
- Centralized management of SSL certificates
- Server Name Indication (SNI): SSL Scalability
- Use ASP.NET 3.5 and 4.5
- ASP.NET Configuration Management
- Dynamic IP Address Restrictions
- Multicore Scaling on NUMA hardware

Our IIS 8  Hosting Packages

Our IIS 8 Windows Hosting Package starts from as low as $4.49/month only and the package has included the following features:

- Windows Server 2012
- World Class Control Panel
- ASP.NET 4.5 and ASP.NET MVC 4
- Silverlight 5
- WCF RIA Service
- VS 2012
- VS Lightswitch
- WebMatrix
- One-click publish
- SQL 2012

For more information, please contact ASPHostCentral.com.


VS 2012 Hosting :: ASP.NET Web Forms 4.5 new features in Visual Studio 2012

clock September 25, 2012 08:13 by author Administrator

This post discusses about ASP.NET Web Forms 4.5 features, Web Forms in 4.5 allows you to build dynamic web sites quickly and easily. Web Forms generates much cleaner code on client-side with Unobtrusive Validation in this version. You can also build data-centric applications easily with data-binding features.

If you like to host your ASP.NET Web Forms 4.5, you can have a look at
asphostcentral.com

Typical Web Form which contains more fields and validation controls can generate more code on client-side. When you run this typical form in browser then you can see the page size as below


The reason for this size is because client-side validation is enabled. If you change Unobtrusive validation mode in page load to web forms then you can see the difference.


Now re-compile your application and run the page the result is as shown below, Now page size is much smaller than before


Strongly typed Data Controls

Take a typical Search Form which shows the results in list view. Inside list view you have item template which is having multiple calls to the EVAL expression as shown below


The above method is the standard way of doing data-binding in web forms. You optimize the above using strongly typed data controls.

You can set the Item Type property of List View to the type that you actually data-binding to as shown below


Now you can member variables in place of Eval expressions, member variables are now typed and you will get an Intel license on item class


Model Binding

You may be familiar with Model Binding in ASP.NET MVC, The typical code which you might write in web forms to bind the results in web forms as below


The above code talking to the data base by building a query which does a case insensitive search then it coverts into list binds the results to list view. Let us re-write the above code using Model-Binding


Now there is no page load and click-handler, The above code is not directly interacting with the page. You can populate the formTerm and qsTerm variables using attributes Control and QueryString in model-binding.

The return result of GetResults method is IQueryable. Because the result is of type IQueryable the control has the ability to modify this before it is rendering it to the page. You can use this in sorting and paging. You can specify the same in markup.

Advantage of using Model Binding


As the code is not directly interacting with the page, you can fairly easily unit test the method or even move it to the completely different class.

Support for OpenID in OAuth Logins


The AuthConfig.cs file is standard in all new projects that created in ASP.NET 4.5 in Visual Studio 2012. You can see there are number of external services code is commented out and it is ready to use by putting your custom application credentials.

Now you can use external services to login to the application.

These are the features which you can try out in Visual Studio 2012.


ASP.NET 4.5 Hosting: Filtering using Model Binding in ASP.NET Web Forms

clock September 17, 2012 08:15 by author Administrator

In ASP.NET 4.5, we are provided with the ‘System.Web.ModelBinding’ namespace. This namespace contains value provider classes e.g. ControlAttribute, QueryStringAttribute etc. These classed are inherited from ‘ValueProviderSourceAttribute’. This base class is used to define method parameters to specify source of values for model binding. The means that the parameter passed to the method specifies what value is to be taken for filtering records and what is the source of the value. This source may be Control, QueryString etc.

Step 1: Open Visual Studio 2011 Developer Preview and create a ASP.NET Web Application targeted to .NET 4.5. Name it as ‘ASPNET45_ModelBinding’. To this project, add two new Folders with the name ‘Model’ and ‘Employee’.

Step 2: In the model folder, add a new ADO.NET Entity Framework and  name it as ‘CompanyEDMX.edmx’. This EMD makes use of SQL Server 2008 and a Company Database in it.

The Schema of the Tables in the Company Database is as below:


Department - DeptNo (int) Primary Key, Dname (varchar(50)),Location (varchar(50)).
Employee - EmpNo (int) Primary Key, EmpName (varchar(50)),Salary (int), DeptNo(int) Foreign Key.

After the Wizard completes, the ADO.NET EF model will be as shown below:

Department Employee Table

Step 3: In the Employee folder, add a web form (with master page). Name it as ‘Employees.aspx’. Open the Employee.aspx in Source view and add DropDownList and GridView on it. Set properties of these controls as shown below:


The Entire Page Design markup will be as shown below:


Step 4: Open the Employees.aspx.cs and add the following code in it:

The important part in the code shown above is the ‘GetEmployees()’ method, which accepts a nullable parameter - DeptNo. This is defined using the [Control] attributes. This attribute class defines the constructor which accepts the ID of the control from which the source value is accepted. In the above case, the source control is the DropDownList with ID as ‘ddlDeptName’. Here the ‘GetEmployees()’ method accepts the DeptNo and based upon this value, the related Employees are read from the Employees collection.

Another important portion of the GridView code shown above is that the AllowPaging property is set to true. In the earlier versions of ASP.NET, it was necessary of a Developer to write the code for pagination in similar scenarioes. But in this case, the ‘GetEmployees()’ method returns ‘IQueryable’. Now  when the end-user changes the page-index of the GridView, the query is automatically updated and the next page records are displayed.

Step 5: Run the Employees.aspx and select the Dname from the DropDownList.

Conclusion: Using ASP.NET 4.5 Model Binding Value providers, communication between controls can be made possible by using less code.


SharePoint 2013 Hosting with ASPHostCentral.com

clock September 14, 2012 08:51 by author Administrator

ASPHostCentral.com, the leader in ASP.NET and Windows Hosting Provider, proudly announces that we have supported the latest SharePoint 2013 Hosting

We offer this newest
SharePoint 2013 Hosting Package from just $15.99/month. Our SharePoint 2013 hosting plan comes with a list of complete features, such as:

- Massive Document Storage Space
- Massive Bandwidth
- Unlimited Number of SharePoint Users / Accounts
- SharePoint Designer 2013
- Support Third-Party (Custom) Web Parts)
- Support International Language Packs
- Support SSL for higher data integrity
- Support Anonymous, Public-Facing Access


To make our SharePoint 2013 even more complete, we have added extra features free of charge to the package. These features are:

- .NET 4.5 and ASP.NET MVC 4.0 Framework
- Silverlight 5.0
- SQL Server 2012
- Entity Framework (EF)
- WebMatrix and WebDeploy
- Windows 2012 Hosting
- WCF RIA Service
- World Class Control Panel
- 24/7 Support
- 99.9% Uptime Guarantee
- Choice of US or European Data Center
- 30-days Money Back Guarantee

SharePoint 2013 is the new way to work together. A simplified user experience helps you organize, sync and share all your content. New social capabilities make it easy to share ideas, keep track of what your colleagues are working on, and discover experts you never knew existed.

Putting a SharePoint team website in place for your business is a fast, cost-effective way to facilitate team communication while creating a professional looking website. Team sites based on Windows SharePoint Services are useful right out of the box. You can customize your site, changing its appearance and adding functionalities without using other applications or doing any programming

Obviously, we still support the SharePoint 2010 Hosting on our Windows Server environment.


ASP.NET MVC 4 Hosting :: Working with HTML5 Chart Helper Extension for ASP.NET MVC 4

clock September 11, 2012 06:41 by author Administrator

With the introduction of ASP.NET MVC, the traditional ‘Control’ model of GUI component development went away. Instead it was replaced with the more Web 2.0 style JavaScript and jQuery plugin extensibility model. Nevertheless, adding incremental features to existing HTML components was always required and towards this end Microsoft introduced the HtmlHelper and helper extensions. Helper extensions are .NET extension methods that return a string. Typically, this string is formatted HTML content.


In our sample today we create an extension that renders a bar chart on HTML5 Canvas. It can be bound to a data source from the server side or be assigned data source from the client side.

Building a Html Helper Extension

Html Helper extensions are easy to build. Just follow the steps below to create our helper skeleton.

Step 1: We start with an MVC project and pick the Blank template.

Note we could pick a class library project template too and add package references as follows (via the Nuget package manager as follows)

a. PM> install-package Microsoft.AspNet.Mvc
b. Add reference to System.Web.dll from the ‘Add References’ dialog for the project

Step 2: Add a static class called ChartExtensions. Extension methods, by design, have to be defined in Static classes.

Step 3: Next add a static method Chart whose first parameters is this HtmlHelper and subsequent parameters are values required for rendering the chart.


a. The dataSource is a list of integer arrays. For the example we have assumed a two dimensional array would be provided as a data source. We can make it more sophisticated by making it an array of objects and binding to different properties of the object.
b. xTitle: The text to be displayed on the x-axis.
c. yTitle: The text to be displayed on the y-axis.

Step 4: Next we setup two methods, one to convert the dataSource to JSON and the other to generate the required HTML.


a. The GetDataSourceFromIntArray method uses the System.Web.Helpers’ Json static class to convert the input data source into a Json String. This string is assigned to a variable called arrDataSource and the whole string is returned.
b. The SetupHtml method implements the rendering logic

Step 5: Using TagBuilder to build the Html: ASP.NET provides us with the TagBuilder class that has helper methods to help create HTML elements easily. We use the TagBuilder to create our HTML layout as follows

<div>
<canvas …> … </canvas>
<script …> … </script>
<noscript> … </noscript>
</div>

The actual code is as follows


a. As seen above, the TagBuilder object has an Attributes collection to which we can add the HTML attributes we need. To set text between the opening tag and closing tag, we use the SetInnerText. However unlike an XmlTextWriter, we can’t nest tags. To nest tags we simply assign the string representation of the TagBuilder to the InnerHtml of the parent TagBuilder. So the ‘container’ Tag Builder has the <div> that encapsulates the Canvas and the Script tags.
b. We have created a 400x600 canvas area. The chartName parameter is used for the id of the canvas element.
c. For now we have an empty SetupScript method. This method will eventually build the JavaScript required to render the bar graph.
d. The <noscript> tag holds the message to display when JavaScript is not enabled on the browser.
e. Point to note is the HtmlString object that is returned. The HtmlString is a special object that indicates to the Razor view engine that it should not Html Encode this string any further. If we use string instead of HtmlString, the Razor engine automatically Html Encodes the string and we see the markup as text instead of rendered Html.

Step 6: The SetupScript method: The setup script method has the JavaScript that actually renders the chart on the canvas. The original code is borrowed (with permission) from this project. A demo for it is available here. We have to make the following changes so that it accepts any data source instead of the fixed data source assigned to it in the demo. We have also updated the code to use the strings passed in for x-axis and y-axis labels. Beyond this the animation and rendering code is pretty much the same.

a. The variable initialization change

Earlier we had a hard-coded array of strings that was rendered on the canvas. Now we have the Json string that is created from the data source that was passed to the helper.
b. Changes to the barChart() method to set data source on the client side.

In the barChart method we earlier had no parameters and the elementId was hard-coded, now we use the value that’s passed into the helper.
We also pass a data parameter that is assigned to the data source of the graph.
c. Changes in drawMarkers() method to use the values passed into the helper for the x-axis and y-axis label

d. Changes to handle two-dimensional array of points instead of one-dimensional array of comma separated strings.


In the original code, the data source is an array of strings. Each element in the array has two comma separated values, represent the year (at index-0) and number of hits (at index-1). We have updated our data source to be a two-dimensional array and hence we don’t need to do a string split to get the value. We directly access the value using appropriate indexes. This change is at three places in the code. One of them is shown above.

With these changes in place our Chart, HtmlHelper is ready to be tested in an ASP.NET Web Application

Integrating the Custom Helper in a MVC Web Application

With our Helper all set, we add an MVC Web Application to our solution and call it DotNetCurry.HtmlHelpers.WebHarness. We use the Internet template that gives us a default Index.cshtml to put our Helper in. The following steps guide us through the integration effort

Step 1: Add Reference to the HtmlHelper project.

Step 2: Add a Model class in the Models folder.


This is our view model that will hold the data to be rendered in the Graph.

Step 3: Update the HomeController to create and pass sample data model.


As seen above, we create an instance of our ViewModel class and add some test data into it. We pass this data on to the Index view, where the HtmlHelper will use it.

Step 4: Update the Index.cshtml markup to use the helper


The changes in Index.cshtml highlighted above, from top to bottom are as follows

a. Declare the model to be used in the page.
b. Add using to include the custom HtmlHelper
c. Added the HtmlForm inside which we use our Chart Helper extension. We give it an id=’sampleChart’, pass it the Model.Data and provide the labels for the x and y axes.
d. Finally in the jQuery document ready function, we initialize the chart by calling the barChart() method.
e. Our final effort looks as follows.

 
To change the graph change the data set coming from the controller.

That brings us to the end of this tutorial. We round off with some of the improvements possible.

Possible Improvements

1. Update the script to be able to bind to any Json object.
2. Use jQuery plugin syntax so that more than one helper can be created per page.
3. Allow more flexibility like passing parameters for bar colors, size of chart etc.
4. Allow multiple data sources to show comparison side by side.
5. Add more chart types like Pie etc.

Conclusion

Though they sound esoteric HtmlHelper extensions is a rather simple mechanism to inject rich functionality in a componentized way in ASP.NET MVC applications. We converted an existing HTML5 chart, originally created using plain HTML5 and JavaScript into a Chart HtmlHelper with very little code. For large projects, HtmlHelpers are a neat way to encapsulate small pieces of re-usable UI functionality


ASP.NET 4.5 Hosting :: Working with Asynchronous Operations in ASP.NET 4.5 Web Forms

clock September 4, 2012 06:28 by author Administrator


Introduction

Asynchronously running code can improve the overall performance and responsiveness of your web application. In ASP.NET 4.5 web forms applications you can register asynchronous methods with the page framework. The ASP.NET page framework and .NET 4.5 asynchronous programming supports then executes the operations in asynchronous fashion. This article shows how this can be done.

NOTE: This article discusses how asynchronous operations can be used in ASP.NET web forms applications. Read Working with Asynchronous Operations in ASP.NET MVC to learn how asynchronous operations can be programed in ASP.NET MVC applications.

If you are looking to host your ASP.NET 4.5 website, you can check out ASPHostCentral.com


Example Scenario

Consider that you have a web application that needs to call two ASP.NET Web API services namely Customer and Product. These services return Customer and Product data from the Northwind database respectively. Now, assume that each of these services take 5 seconds to complete the data retrieval operation. If you use synchronous mode for calling these services then the total time taken will be 10 seconds. Because the execution will happen sequentially - first Customer service will complete and then Product service will complete.

On the other hand if you invoke these services in asynchronous fashion, the service operations won't block the caller thread. The Customer service will be invoked and control will be immediately returned to the caller. The caller thread will then proceed to invoke the Product service. So, two operations will be invoked in parallel. In this case the total time taken for completing both of the operations will be the time taken by the longest of the operations (5 seconds in this case).

Async, Await, Task and RegisterAsyncTask

Before developing web forms applications that execute asynchronous operations you need to understand a few basic terms involved in the process.

A task is an operation that is to be executed in asynchronous fashion. Such an operation is programmatically represented by the Task class from System.Threading.Tasks namespace.

When an asynchronous operation begins, the caller thread can continue its work further. However, the caller thread must wait at some point of time for the asynchronous operation to complete. The await keyword invokes an asynchronous operation and waits for it to complete.

The async modifier is applied to a method that is to be invoked asynchronously. Such an asynchronous method typically returns a Task object and has at least one await call inside it.

Just to understand how async, await and task are used at code level, consider the following piece of code:

public async Task<MyObject> MyMethodAsync()
{
  MyObject data = await service.GetDataAsync();
  //other operations on data go here
  return data;
}

Here, method MyMethodAsync() is marked with async modifier. By convention, asynchronous method names end with "Async". The MyMethodAsync() returns MyObject wrapped inside a Task instance. Inside the method a remote service is invoked using GetDataAsync(). Since MyMethodAsync() needs to return data retrieved from the service, the await keyword is used to wait till the GetDataAsync() method returns. Once GetDataAsync() returns the execution is resumed and further code is executed. The data is finally returned to the caller.

NOTE:
For a detailed understanding of async, await and Task refer to MSDN dicumentation. Here, these terms are discussed only for giving a basic understanding of the respective keywords.

ASP.NET page framework provides a method - RegisterAsyncTask() - that registers an asynchronous task with the page framework. Tasks registered using the RegisterAsyncTask() method are invoked immediately after the PreRender event. The RegisterAsyncTask() method takes a parameter of type PageAsyncTask. The PageAsyncTask object wraps the information about an asynchronous task registered with a page. The following piece of code shows how they are used:

protected void Page_Load(object sender, EventArgs e)
{
   PageAsyncTask task = new PageAsyncTask(MyMethod);
   RegisterAsyncTask(task);
}

Asynchronous Solution

Now that you are familiar with the basic concepts involved in utilizing asynchronous operations in a web forms application, let's create a sample application that puts this knowledge to use.

Begin by creating two projects - an empty web forms application and an ASP.NET MVC4 Web API application.

Add an Entity Framework Data Model for the Customers and Products tables of the Northwind database. Place the EF data model inside the Models folder.
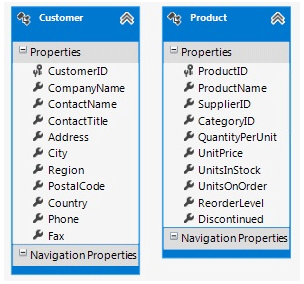


Add an Entity Framework Data Model for the Customers and Products tables

Add two ApiController classes to the Web API project and name them as CustomerController and ProductController.
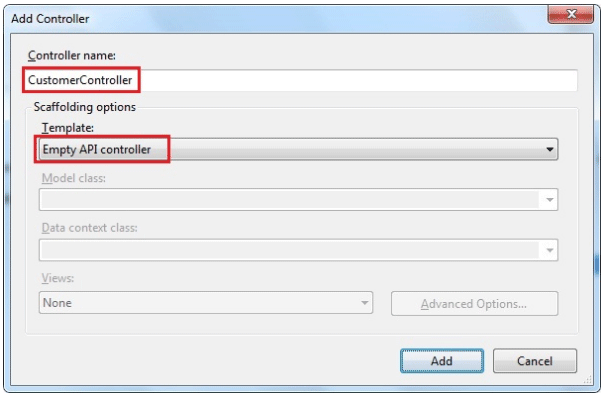


Add two ApiController classes

Then add Get() methods to both the ApiController classes as shown below:

public class CustomerController : ApiController
{
    public IEnumerable<Customer> Get()
    {
        Northwind db = new Northwind();
        var data = from item in db.Customers
                    select item;
        System.Threading.Thread.Sleep(5000);
        return data;
    }
}

public class ProductController : ApiController
{
    public IEnumerable<Product> Get()
    {
        Northwind db = new Northwind();
        var data = from item in db.Products
                    select item;
        System.Threading.Thread.Sleep(5000);
        return data;
    }
}

The Get() method of the CustomerController class selects all the Customer records from the Customers table whereas the Get() method of the ProductController class selects all the Product records. For the sake of testing, a delay of 5 seconds is introduced in each Get() method. The Get() methods return an IEnumerable collection of Customer and Product objects respectively.

Now, go to the web forms project and open the code behind file of the default web form. Here, you will write a couple of private methods that invoke the Web API developed previously. These methods are shown below:

public async Task<List<Customer>> InvokeCustomerService()
{
    using (HttpClient client = new HttpClient())
    {
        HttpResponseMessage response = await client.GetAsync("http://localhost:49187/api/customer");
        string json= (await response.Content.ReadAsStringAsync());
        List<Customer> data = JsonConvert.DeserializeObject<List<Customer>>(json);
        return data;
    }
}

public async Task<List<Product>> InvokeProductService()
{
    using (HttpClient client = new HttpClient())
    {
        HttpResponseMessage response = await client.GetAsync("http://localhost:49187/api/product");
        string json = (await response.Content.ReadAsStringAsync());
        List<Product> data = JsonConvert.DeserializeObject<List<Product>>(json);
        return data;
    }
}

The InvokeCustomerService() method invokes the Customer Web API whereas InvokeProductService() method invokes Product Web API. Both the methods essentially use an HttpClient to get data from the respective Web API. Notice that both the methods have async modifier and return a Task instance that wraps the actual return type (List<Customer> and List<Product> respectively). The GetAsync() method of the HttpClient object is an asynchronous method. Call to the GetAsync() is marked using the await keyword so that further statements are executed only when GetAsync() returns. The GetAsync() method accepts a URL of the respective Web API. Make sure to change the port number as per your development setup. The GetAsync() method returns an HttpResponseMessage object. The actual data is then retrieved using ReadAsStringAsync() method of the Content property. The ReadAsStringAsync() will return data as a JSON string. This JSON data is converted into a .NET generic List using DeserializeObject() method of the JsonConvert class. The JsonConvert class comes from the Json.NET open source componenet. You can download Json.NET here.

The InvokeCustomerService() and InvokeProductService() methods are called inside another private method GetDataFromServicesAsync() as shown below:

private async Task GetDataFromServicesAsync()
{
    Stopwatch stopWatch = new Stopwatch();
    stopWatch.Start();
    var task1 = InvokeCustomerService();
    var task2 = InvokeProductService();
    await Task.WhenAll(task1, task2);

    List<Customer> data1 = task1.Result;
    List<Product> data2 = task2.Result;           

    stopWatch.Stop();
    Label2.Text = string.Format("<h2>Retrieved {0} customers and {1} products in {2} seconds.</h2>",                                  data1.Count, data2.Count, stopWatch.Elapsed.TotalSeconds);
}

As shown above, GetDataFromServicesAsync() is also marked as async and returns a Task instance. Inside, a StopWatch class from System.Diagnostics namespace is used to find the time taken by both of the operations to complete. InvokeCustomerService() and InvokeProductService() methods are then called. The returned Task instance is stored in task1 and task2 variables respectively. The WhenAll() method of Task class creates another Task that completes when all the specified tasks are complete. In this case it creates a Task that completes after complition of task1 and task2. Actual data returned by the respective Web API is retrieved using the Result property of the respective Task objects. The time taken to complete the operation is measured by the StopWatch and is displayed in a Label.

The next step is to register GetDataFromServicesAsync() with the page framework. This is done using the RegisterAsyncTask() method as shown below:

protected void Page_Load(object sender, EventArgs e)
{
    RegisterAsyncTask(new PageAsyncTask(GetDataFromServicesAsync));
}

As you can see, Page_Load event handler registers an asynchronous task using RegisterAsyncTask() method. The RegisterAsyncTask() method accepts an instance of PageAsyncTask. The PageAsyncTask instance in turn wraps the GetDataFromServicesAsync() method created earlier.

The final step is to set Async attribute of the @Page directive to true:

<%@ Page Async="true" Language="C#" CodeBehind="WebForm1.aspx.cs" ... %>

The Aync attribute of the @Page directive indicates that this web form will be executed in asynchronous fashion. Web forms that use RegisterAsyncTask() method must set the Async attribute to true, otherwise an exception is raised at runtime.

This completes the application and you can test it by running the web forms application. The following figure shows a sample run of the web form:
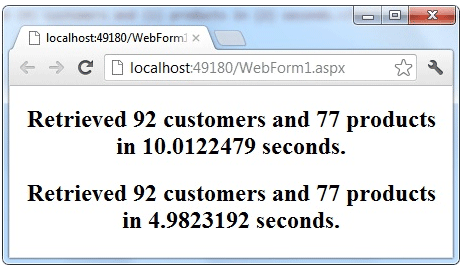
 
A sample run of the web form

Though the code doesn't show the synchronous execution of the Web API operations, for the sake of better understanding the above figure shows time taken for synchronous as well as asynchronous execution. Recollect that both the Get() methods sleep for 5 seconds and hence the synchronous execution takes approximately 10 seconds. However, the asynchronous execution takes approximately 5 seconds. As you can see the asynchronous operation improves the overall performance of the application.

Summary

Using async and await keywords you can create operations that run asynchronously. Such asynchronous tasks can be registered with the page framework using RegisterAsyncTask() method. Registered tasks run immediately after the PreRender event of the web form. Asynchronous operations can improve the overall performance and user responsiveness of a web application.


ASP.NET 4.0 & ASP.NET 4.5 Hosting


ASPHostCentral is a premier web hosting company where you will find low cost and reliable web hosting. We have supported the latest ASP.NET 4.5 hosting and ASP.NET MVC 4 hosting. We have supported the latest SQL Server 2012 Hosting and Windows Server 2012 Hosting too!


Calendar

<<  April 2024  >>
MoTuWeThFrSaSu
25262728293031
1234567
891011121314
15161718192021
22232425262728
293012345

View posts in large calendar

Sign in