ASP.NET 4.0 Hosting & ASP.NET 4.5 Hosting BLOG

BLOG about ASP.NET 4.5 Hosting, ASP.NET 4.0 Hosting and .NET 4.5 Framework and its Capabilities

VS 2012 Hosting :: ASP.NET Web Forms 4.5 new features in Visual Studio 2012

clock September 25, 2012 08:13 by author Administrator

This post discusses about ASP.NET Web Forms 4.5 features, Web Forms in 4.5 allows you to build dynamic web sites quickly and easily. Web Forms generates much cleaner code on client-side with Unobtrusive Validation in this version. You can also build data-centric applications easily with data-binding features.

If you like to host your ASP.NET Web Forms 4.5, you can have a look at
asphostcentral.com

Typical Web Form which contains more fields and validation controls can generate more code on client-side. When you run this typical form in browser then you can see the page size as below


The reason for this size is because client-side validation is enabled. If you change Unobtrusive validation mode in page load to web forms then you can see the difference.


Now re-compile your application and run the page the result is as shown below, Now page size is much smaller than before


Strongly typed Data Controls

Take a typical Search Form which shows the results in list view. Inside list view you have item template which is having multiple calls to the EVAL expression as shown below


The above method is the standard way of doing data-binding in web forms. You optimize the above using strongly typed data controls.

You can set the Item Type property of List View to the type that you actually data-binding to as shown below


Now you can member variables in place of Eval expressions, member variables are now typed and you will get an Intel license on item class


Model Binding

You may be familiar with Model Binding in ASP.NET MVC, The typical code which you might write in web forms to bind the results in web forms as below


The above code talking to the data base by building a query which does a case insensitive search then it coverts into list binds the results to list view. Let us re-write the above code using Model-Binding


Now there is no page load and click-handler, The above code is not directly interacting with the page. You can populate the formTerm and qsTerm variables using attributes Control and QueryString in model-binding.

The return result of GetResults method is IQueryable. Because the result is of type IQueryable the control has the ability to modify this before it is rendering it to the page. You can use this in sorting and paging. You can specify the same in markup.

Advantage of using Model Binding


As the code is not directly interacting with the page, you can fairly easily unit test the method or even move it to the completely different class.

Support for OpenID in OAuth Logins


The AuthConfig.cs file is standard in all new projects that created in ASP.NET 4.5 in Visual Studio 2012. You can see there are number of external services code is commented out and it is ready to use by putting your custom application credentials.

Now you can use external services to login to the application.

These are the features which you can try out in Visual Studio 2012.


ASP.NET 4.5 Hosting: Filtering using Model Binding in ASP.NET Web Forms

clock September 17, 2012 08:15 by author Administrator

In ASP.NET 4.5, we are provided with the ‘System.Web.ModelBinding’ namespace. This namespace contains value provider classes e.g. ControlAttribute, QueryStringAttribute etc. These classed are inherited from ‘ValueProviderSourceAttribute’. This base class is used to define method parameters to specify source of values for model binding. The means that the parameter passed to the method specifies what value is to be taken for filtering records and what is the source of the value. This source may be Control, QueryString etc.

Step 1: Open Visual Studio 2011 Developer Preview and create a ASP.NET Web Application targeted to .NET 4.5. Name it as ‘ASPNET45_ModelBinding’. To this project, add two new Folders with the name ‘Model’ and ‘Employee’.

Step 2: In the model folder, add a new ADO.NET Entity Framework and  name it as ‘CompanyEDMX.edmx’. This EMD makes use of SQL Server 2008 and a Company Database in it.

The Schema of the Tables in the Company Database is as below:


Department - DeptNo (int) Primary Key, Dname (varchar(50)),Location (varchar(50)).
Employee - EmpNo (int) Primary Key, EmpName (varchar(50)),Salary (int), DeptNo(int) Foreign Key.

After the Wizard completes, the ADO.NET EF model will be as shown below:

Department Employee Table

Step 3: In the Employee folder, add a web form (with master page). Name it as ‘Employees.aspx’. Open the Employee.aspx in Source view and add DropDownList and GridView on it. Set properties of these controls as shown below:


The Entire Page Design markup will be as shown below:


Step 4: Open the Employees.aspx.cs and add the following code in it:

The important part in the code shown above is the ‘GetEmployees()’ method, which accepts a nullable parameter - DeptNo. This is defined using the [Control] attributes. This attribute class defines the constructor which accepts the ID of the control from which the source value is accepted. In the above case, the source control is the DropDownList with ID as ‘ddlDeptName’. Here the ‘GetEmployees()’ method accepts the DeptNo and based upon this value, the related Employees are read from the Employees collection.

Another important portion of the GridView code shown above is that the AllowPaging property is set to true. In the earlier versions of ASP.NET, it was necessary of a Developer to write the code for pagination in similar scenarioes. But in this case, the ‘GetEmployees()’ method returns ‘IQueryable’. Now  when the end-user changes the page-index of the GridView, the query is automatically updated and the next page records are displayed.

Step 5: Run the Employees.aspx and select the Dname from the DropDownList.

Conclusion: Using ASP.NET 4.5 Model Binding Value providers, communication between controls can be made possible by using less code.


ASP.NET 4.5 Hosting :: Working with Asynchronous Operations in ASP.NET 4.5 Web Forms

clock September 4, 2012 06:28 by author Administrator


Introduction

Asynchronously running code can improve the overall performance and responsiveness of your web application. In ASP.NET 4.5 web forms applications you can register asynchronous methods with the page framework. The ASP.NET page framework and .NET 4.5 asynchronous programming supports then executes the operations in asynchronous fashion. This article shows how this can be done.

NOTE: This article discusses how asynchronous operations can be used in ASP.NET web forms applications. Read Working with Asynchronous Operations in ASP.NET MVC to learn how asynchronous operations can be programed in ASP.NET MVC applications.

If you are looking to host your ASP.NET 4.5 website, you can check out ASPHostCentral.com


Example Scenario

Consider that you have a web application that needs to call two ASP.NET Web API services namely Customer and Product. These services return Customer and Product data from the Northwind database respectively. Now, assume that each of these services take 5 seconds to complete the data retrieval operation. If you use synchronous mode for calling these services then the total time taken will be 10 seconds. Because the execution will happen sequentially - first Customer service will complete and then Product service will complete.

On the other hand if you invoke these services in asynchronous fashion, the service operations won't block the caller thread. The Customer service will be invoked and control will be immediately returned to the caller. The caller thread will then proceed to invoke the Product service. So, two operations will be invoked in parallel. In this case the total time taken for completing both of the operations will be the time taken by the longest of the operations (5 seconds in this case).

Async, Await, Task and RegisterAsyncTask

Before developing web forms applications that execute asynchronous operations you need to understand a few basic terms involved in the process.

A task is an operation that is to be executed in asynchronous fashion. Such an operation is programmatically represented by the Task class from System.Threading.Tasks namespace.

When an asynchronous operation begins, the caller thread can continue its work further. However, the caller thread must wait at some point of time for the asynchronous operation to complete. The await keyword invokes an asynchronous operation and waits for it to complete.

The async modifier is applied to a method that is to be invoked asynchronously. Such an asynchronous method typically returns a Task object and has at least one await call inside it.

Just to understand how async, await and task are used at code level, consider the following piece of code:

public async Task<MyObject> MyMethodAsync()
{
  MyObject data = await service.GetDataAsync();
  //other operations on data go here
  return data;
}

Here, method MyMethodAsync() is marked with async modifier. By convention, asynchronous method names end with "Async". The MyMethodAsync() returns MyObject wrapped inside a Task instance. Inside the method a remote service is invoked using GetDataAsync(). Since MyMethodAsync() needs to return data retrieved from the service, the await keyword is used to wait till the GetDataAsync() method returns. Once GetDataAsync() returns the execution is resumed and further code is executed. The data is finally returned to the caller.

NOTE:
For a detailed understanding of async, await and Task refer to MSDN dicumentation. Here, these terms are discussed only for giving a basic understanding of the respective keywords.

ASP.NET page framework provides a method - RegisterAsyncTask() - that registers an asynchronous task with the page framework. Tasks registered using the RegisterAsyncTask() method are invoked immediately after the PreRender event. The RegisterAsyncTask() method takes a parameter of type PageAsyncTask. The PageAsyncTask object wraps the information about an asynchronous task registered with a page. The following piece of code shows how they are used:

protected void Page_Load(object sender, EventArgs e)
{
   PageAsyncTask task = new PageAsyncTask(MyMethod);
   RegisterAsyncTask(task);
}

Asynchronous Solution

Now that you are familiar with the basic concepts involved in utilizing asynchronous operations in a web forms application, let's create a sample application that puts this knowledge to use.

Begin by creating two projects - an empty web forms application and an ASP.NET MVC4 Web API application.

Add an Entity Framework Data Model for the Customers and Products tables of the Northwind database. Place the EF data model inside the Models folder.
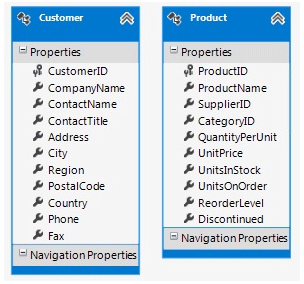


Add an Entity Framework Data Model for the Customers and Products tables

Add two ApiController classes to the Web API project and name them as CustomerController and ProductController.
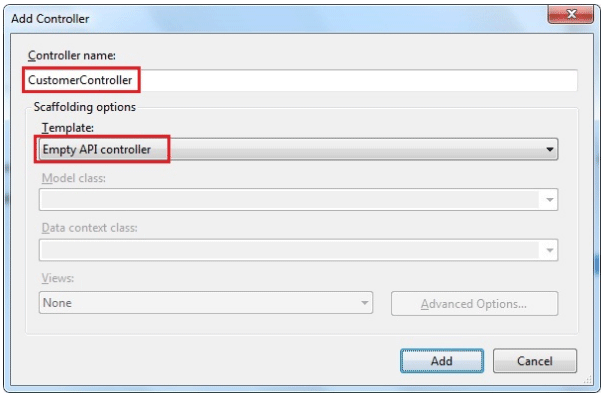


Add two ApiController classes

Then add Get() methods to both the ApiController classes as shown below:

public class CustomerController : ApiController
{
    public IEnumerable<Customer> Get()
    {
        Northwind db = new Northwind();
        var data = from item in db.Customers
                    select item;
        System.Threading.Thread.Sleep(5000);
        return data;
    }
}

public class ProductController : ApiController
{
    public IEnumerable<Product> Get()
    {
        Northwind db = new Northwind();
        var data = from item in db.Products
                    select item;
        System.Threading.Thread.Sleep(5000);
        return data;
    }
}

The Get() method of the CustomerController class selects all the Customer records from the Customers table whereas the Get() method of the ProductController class selects all the Product records. For the sake of testing, a delay of 5 seconds is introduced in each Get() method. The Get() methods return an IEnumerable collection of Customer and Product objects respectively.

Now, go to the web forms project and open the code behind file of the default web form. Here, you will write a couple of private methods that invoke the Web API developed previously. These methods are shown below:

public async Task<List<Customer>> InvokeCustomerService()
{
    using (HttpClient client = new HttpClient())
    {
        HttpResponseMessage response = await client.GetAsync("http://localhost:49187/api/customer");
        string json= (await response.Content.ReadAsStringAsync());
        List<Customer> data = JsonConvert.DeserializeObject<List<Customer>>(json);
        return data;
    }
}

public async Task<List<Product>> InvokeProductService()
{
    using (HttpClient client = new HttpClient())
    {
        HttpResponseMessage response = await client.GetAsync("http://localhost:49187/api/product");
        string json = (await response.Content.ReadAsStringAsync());
        List<Product> data = JsonConvert.DeserializeObject<List<Product>>(json);
        return data;
    }
}

The InvokeCustomerService() method invokes the Customer Web API whereas InvokeProductService() method invokes Product Web API. Both the methods essentially use an HttpClient to get data from the respective Web API. Notice that both the methods have async modifier and return a Task instance that wraps the actual return type (List<Customer> and List<Product> respectively). The GetAsync() method of the HttpClient object is an asynchronous method. Call to the GetAsync() is marked using the await keyword so that further statements are executed only when GetAsync() returns. The GetAsync() method accepts a URL of the respective Web API. Make sure to change the port number as per your development setup. The GetAsync() method returns an HttpResponseMessage object. The actual data is then retrieved using ReadAsStringAsync() method of the Content property. The ReadAsStringAsync() will return data as a JSON string. This JSON data is converted into a .NET generic List using DeserializeObject() method of the JsonConvert class. The JsonConvert class comes from the Json.NET open source componenet. You can download Json.NET here.

The InvokeCustomerService() and InvokeProductService() methods are called inside another private method GetDataFromServicesAsync() as shown below:

private async Task GetDataFromServicesAsync()
{
    Stopwatch stopWatch = new Stopwatch();
    stopWatch.Start();
    var task1 = InvokeCustomerService();
    var task2 = InvokeProductService();
    await Task.WhenAll(task1, task2);

    List<Customer> data1 = task1.Result;
    List<Product> data2 = task2.Result;           

    stopWatch.Stop();
    Label2.Text = string.Format("<h2>Retrieved {0} customers and {1} products in {2} seconds.</h2>",                                  data1.Count, data2.Count, stopWatch.Elapsed.TotalSeconds);
}

As shown above, GetDataFromServicesAsync() is also marked as async and returns a Task instance. Inside, a StopWatch class from System.Diagnostics namespace is used to find the time taken by both of the operations to complete. InvokeCustomerService() and InvokeProductService() methods are then called. The returned Task instance is stored in task1 and task2 variables respectively. The WhenAll() method of Task class creates another Task that completes when all the specified tasks are complete. In this case it creates a Task that completes after complition of task1 and task2. Actual data returned by the respective Web API is retrieved using the Result property of the respective Task objects. The time taken to complete the operation is measured by the StopWatch and is displayed in a Label.

The next step is to register GetDataFromServicesAsync() with the page framework. This is done using the RegisterAsyncTask() method as shown below:

protected void Page_Load(object sender, EventArgs e)
{
    RegisterAsyncTask(new PageAsyncTask(GetDataFromServicesAsync));
}

As you can see, Page_Load event handler registers an asynchronous task using RegisterAsyncTask() method. The RegisterAsyncTask() method accepts an instance of PageAsyncTask. The PageAsyncTask instance in turn wraps the GetDataFromServicesAsync() method created earlier.

The final step is to set Async attribute of the @Page directive to true:

<%@ Page Async="true" Language="C#" CodeBehind="WebForm1.aspx.cs" ... %>

The Aync attribute of the @Page directive indicates that this web form will be executed in asynchronous fashion. Web forms that use RegisterAsyncTask() method must set the Async attribute to true, otherwise an exception is raised at runtime.

This completes the application and you can test it by running the web forms application. The following figure shows a sample run of the web form:
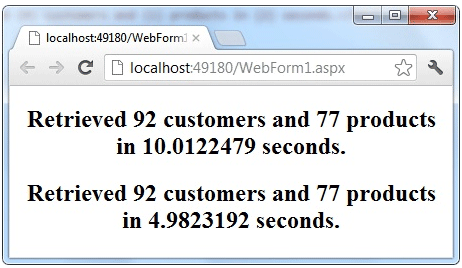
 
A sample run of the web form

Though the code doesn't show the synchronous execution of the Web API operations, for the sake of better understanding the above figure shows time taken for synchronous as well as asynchronous execution. Recollect that both the Get() methods sleep for 5 seconds and hence the synchronous execution takes approximately 10 seconds. However, the asynchronous execution takes approximately 5 seconds. As you can see the asynchronous operation improves the overall performance of the application.

Summary

Using async and await keywords you can create operations that run asynchronously. Such asynchronous tasks can be registered with the page framework using RegisterAsyncTask() method. Registered tasks run immediately after the PreRender event of the web form. Asynchronous operations can improve the overall performance and user responsiveness of a web application.


.NET 4.5 Beta FREE Hosting with ASPHostCentral.com

clock March 14, 2012 08:40 by author Administrator

ASPHostCentral.com, the leader in ASP.NET and Windows Hosting Provider, proudly announces that we will support ASP.NET 4.5 Hosting.

To support Microsoft ASP.NET 4.5 Beta Framework, we gladly inform you that we provide this beta account FREE of charge for a limited time (* terms and conditions apply).


The followings are the features you will get under this FREE ASP.NET 4.5 BETA Account:                

- .NET 4.5 Beta Framework
- 1 Website/Domain
- 100 MB disk space
- 100 MB bandwidth
- 50 MB SQL 2008 space
- 24/7 FTP access
- Windows Server 2008 Platform

 If you want to participate in this Beta program, there are several rules you need to understand:              

- As this is a beta version, not all the features are available. They may be some issues on this beta framework, which will be fixed upon the full release of ASP.NET 4.5 Framework
- ASPHostCentral.com does not guarantee the uptime of the sandbox solution. Additionally, we do not keep/store any backup of your files/accounts
- ASPHostCentral.com does not guarantee rapid response to any inquiries raised by a user
- This free account is only meant for testing. Users should not use it to store a production, personal, e-commerce or any blog-related site
- This free account is used to host any ASP.NET 4.5 beta website only. Any questions that are not related to ASP.NET 4.5 beta will not be responded. A user shall not host any non-ASP.NET 4.5 site on this free account either
- ASPHostCentral.com reserves full rights to terminate this beta program at any time. We will provide a notification on our Help Desk System prior to the termination of this program
- ASPHostCentral.com reserves full rights to terminate a user account, in which we suspect that there is an abuse to our system
- Once this beta program is terminated, your account will be completely wiped/remove from our system.
- For details, please check
http://www.asphostcentral.com/ASPNET-45-Beta-Hosting.aspx
- This offer expires on 31st May 2012

If you want to participate on this FREE ASP.NET 4.5 Beta Program, you must register via https://secure.asphostcentral.com/BetaOrder.aspx


ASP.NET 4.5 Hosting :: ASP.NET 4.5 Strongly Typed Data Controls & Model Binding

clock March 8, 2012 07:43 by author Administrator

One pain point that’s dogged WebForm developers for some time is the fact that there haven’t been any strongly typed data controls.  Some of the data controls I’m speaking of include the Repeater, FormView and GridView controls.  They all used templates, which could allow you to specify a view for different operations, such as when you’re editing data compared to adding new data.

When you use these templates today, they’re using late bound expressions to bind the data.  If you’re using the GridView control, or any of the other data controls, you’ll be familiar with the Bind or Eval syntax:

<asp:GridView ID="GridView1" runat="server" AutoGenerateColumns="false">
      <Columns>
           <asp:TemplateField HeaderText="Name">
                    <ItemTemplate>
                        <asp:Label ID="lblName" runat="server" Text='<%# Bind("Name") %>'></asp:Label>
                    </ItemTemplate>
                </asp:TemplateField>
                <asp:TemplateField HeaderText="City">
                     <ItemTemplate>
                        <asp:Label ID="lblCity" runat="server" Text='<%# Bind("Address.City") %>'></asp:Label>
                     </ItemTemplate>
                </asp:TemplateField>
      </Columns>
 </asp:GridView>


One of the problems with late-bound data controls is you’re using a string to represent a property name.  If you make a mistake typing the name, you won’t see the exception until runtime.  It’s much better to catch these errors at compile time.  Thankfully Microsoft has addressed this in ASP.NET 4.5 by implementing strongly typed data controls.

Installation

Before starting any development, you’ll need to install ASP.NET 4.5.  The simplest way to do this is via the Web Platform Installer.  All of the ASP.NET 4.5 articles I’m authoring are developed in Visual Studio 2011 Developer Preview. Here’s the link to get started.

Strongly Typed Data Controls

ASP.NET 4.5 introduces strongly typed data controls in the templates.  A new ModelType property has been added to the data controls, and this allows you to specify the type of object that is bound to the control.

Setting this property will add that type to the data controls Intellisense (an autocomplete function), which means no more typing mistakes!  This removes the need to run the website to see if you’ve made any typing mistakes during development.

In this example, I’ve connected to a Northwind web service.  Using ASP.NET 4.5, I can set the ModelType to Northwind.  If the requirement is for one-way data binding, you can use the Item expression.  Bind("Name") becomes Item.Name.  The same goes for the City property.  Replace Bind("Address.City") with Item.Address.City.

<asp:GridView ID="GridView1" runat="server" AutoGenerateColumns="false"            ModelType="WebApplication2.NorthwindService.Supplier">
        <Columns>
            <asp:TemplateField HeaderText="Name">
                <ItemTemplate>
                    <asp:Label ID="lblName" runat="server" Text='<%# Item.Name %>'></asp:Label>
                </ItemTemplate>
            </asp:TemplateField>
            <asp:TemplateField HeaderText="City">
                <ItemTemplate>
                    <asp:Label ID="lblCity" runat="server" Text='<%# Item.Address.City %>'></asp:Label>
                </ItemTemplate>
            </asp:TemplateField>
        </Columns>
    </asp:GridView>


For two-way data binding, use Binditem.  So using the example above, data binding to a text box would be like this:

<asp:GridView ID="GridView1" runat="server" AutoGenerateColumns="false"            ModelType="WebApplication2.NorthwindService.Supplier">
        <Columns>
            <asp:TemplateField HeaderText="Name">
                <ItemTemplate>
                    <asp:TextBox ID="txtName" runat="server" Text='<%# Binditem.Name %>'></asp:TextBox>
                </ItemTemplate>
            </asp:TemplateField>
            <asp:TemplateField HeaderText="City">
                <ItemTemplate>
                    <asp:TextBox ID="txtCity" runat="server" Text='<%# Binditem.Address.City %>'></asp:TextBox>
                </ItemTemplate>
            </asp:TemplateField>
        </Columns>

    </asp:GridView>

Intellisense is available, so there’ll be no more mistyped properties you only find out about at runtime.

Model Binding

Model binding focuses on coded data access logic.  Previously if you wanted to display data in the GridView control, you either had to explicitly set the DataSource property and call its DataBind method from the code behind.  Like this example:

protected void Page_Load(object sender, EventArgs e)
{
     var products = GetProducts();
     GridView1.DataSource = products;
     GridView1.DataBind();
}

Alternatively you could use one of the many data source controls to bind the data to the GridView.  Now that model binding is part of ASP.NET, you can explicitly tell the GridView which method to call to retrieve its data by using the SelectMethod property.  Here’s the updated GridView.

<asp:GridView ID="GridView1" runat="server" AutoGenerateColumns="false"            ModelType="WebApplication2.NorthwindService.Supplier"
            SelectMethod="GetProducts">
        <Columns>
            <asp:TemplateField HeaderText="Name">
                <ItemTemplate>
                    <asp:Label ID="lblName" runat="server" Text='<%# Item.Name %>'></asp:Label>
                </ItemTemplate>
            </asp:TemplateField>
            <asp:TemplateField HeaderText="City">
                <ItemTemplate>
                    <asp:Label ID="lblCity" runat="server" Text='<%# Item.Address.City %>'></asp:Label>
                </ItemTemplate>
            </asp:TemplateField>
        </Columns>
    </asp:GridView>


And in the code behind, here’s the GetProducts method:

public IQueryable<NorthwindService.Supplier> GetProducts()
{
    var service = new NorthwindService.DemoService(new Uri(@"http://services.odata.org/OData/OData.svc/"));
    var suppliers = (from p in service.Suppliers
                             select p);
    return suppliers;
}


This method doesn’t need to be in the code behind. It could live in another class or assembly.  The benefit of returning IQueryable  is that it enables deferred execution on the query, and allows a data-bound control to further modify the query before executing it.  This is useful when you need to implement sorting and paging methods.

I’m excited by the model binding and strongly bound data controls in ASP.NET 4.5.  It has certainly borrowed these ideas and concepts from MVC, so fingers crossed more of them are implemented in upcoming versions


ASP.NET 4.5 Hosting :: Model Binding Feature in ASP.NET 4.5

clock November 28, 2011 10:05 by author Administrator

The Good News - In ASP.NET 4.5, we can adopt an approach using which the Model can be directly bound with the DataBound controls and CRUD and pagination operations can be implemented very effectively. It incorporates concepts from the ObjectDataSource control and from model binding in ASP.NET MVC. We will see this shortly. ASP.NET 4.5 is based upon .NET 4.5 and it gets installed once you install Visual Studio 2011 preview. 

Note: If you want to install Visual Studio 2011 preview, you can also use the Windows 8 Developer preview.

In this article I will be explaining a new ASP.NET 4.5 exciting feature called ‘Model Binding with Web Forms’. Up to previous versions, webforms for data-binding used to make use of the ‘Eval’ method. During runtime, calls to Eval makes use of reflection against the currently bound data object and reads value of the member with the given name in Eval method. (Read Why Eval is Evil). Once this value is read the result is displayed in HTML. Although this is easiest way of data-binding, it has limitations like checking the binding name during compilation time etc.

Update: Also check out the second part of this article ASP.NET 4.5: Filtering using Model Binding in ASP.NET Web Forms

In ASP.NET 4.5 the Model Binding has improved. We will be going through the complete model binding feature using the following steps:

- Model binding with Web Forms.
- Value Providers.
- Filtering.
- Performing Update Operations.

For this article I am using Sql Server 2008 R2 and a ‘Company’ database, with following Tables:

Department - DeptNo (int) Primary Key, Dname (varchar(50)),Location (varchar(50)).
Employee - EmpNo (int) Primary Key, EmpName (varchar(50)),Salary (int), DeptNo(int) Forwign Key.

Let’s get started.

Step 1: Open Visual Studio 2011 Developer Preview and create a new Web Application, make sure that the Framework version you select is .NET 4.5. Call this application ‘ASPNET45_ModelBinding’.

Step 2: In this project, add new folders and name them as Model and Department. In the Department folder, add two Web Forms (with master page). Name them as ‘Departments.aspx’ and ‘DepartmentDetails.aspx’.

Step 3: In the Model folder, add a new ADO.NET entity data model and name it as ‘CompanyEDMX.edmx’. In the Wizard, select Company Database and select Department and Employee table. After the completion of wizard, the below result will be displayed:


Step 4: Open the Departments.aspx in the ‘Source’ view and add the Repeater control in it with the Department model bound to it as below.

The above code shows some modified databound features for DataBound controls in ASP.NET 4.5. The Department Model is assigned to the ‘ModelType’ property of the repeater. This property is available to all DataBound controls. This allows us to define the type of data that is bound to the control and also allows to bind properties of the Model inside the control. The above code defines ‘ItemTemplate’ inside the repeater control which refers to the ‘DepartmentDetails.aspx’ by passing DeptNo value using QueryString to it.


Step 5: Go to the Departments.aspx.cs code behind, and write the following code:

The above code sets the datasource property for the repeater control.


Step 6: View the Departments.aspx inside the browser and the following result will be displayed:  
In your OS, observe the lower right corner of the System Tray. Instead of the ASP.NET Development server, ASP.NET 4.5 uses IIS Express as shown below:  


Step 7
: In Step 4, we added the repeater control which has the ItemsTemplate and contains an <a href=””> to navigate to DepartmentDetails.aspx using a query string. This page is designed for displaying details of a particular Department. Open DepartmentDetails.aspx in the ‘Source’ view and add a DetailsView web UI databound control inside it. As explained Step 4, we need to assign the ModelType property of this control to ‘Department’ model.

All those who have used controls like DetailsView or FormView knows that these control are used for performing DML operations. Now to perform DML operations in earlier versions of ASP.NET i.e. from 2.0 to 4.0 we used to make use of ObjectDataProvider and this provider was usually configured using Get,Insert,Update and Delete methods form the source object. However the ASP.NET 4.5 DataBound controls e.g. GridView, FormView, DetailsView etc, exposes the following properties:

- SelectMethod: Used to make call to a method which returns IEnumarable.
- InsertMethod: Used to make call to a method which performs Insert operation.
- UpdateMethod: Used to make call to a method which performs Update operation.
- DeleteMethod: Used to make call to a method which performs Delete operation.

Configure the DepartmentDetails.aspx as shown below:


Step 8: Open the DepartmentDetails.aspx.cs and add the following code in it:    


Now carefully have a look at the above methods. None of these methods make use of any of the UI controls in the user interface. All these methods strictly work on Model objects and this feature drastically reduces additional coding. One more important fact is, if you observe the ‘GetDepartment()’ method, it has defined the ‘DeptNo’ input parameter with the QueryString Value provider. This automatically reads the DeptNo in the QueryString and displays the Department details inside the DetailsView.

Note: In previous versions of ASP.NET we could have done this using Request.QueryString[“DeptNo”]

Step 9: Now open Site.Master and add the following menu item:

<asp:MenuItem NavigateUrl="~/Department/Departments.aspx" Text="Departments"/>

Step 10: Make Default.aspx as a startup page and run the application. You will see the Default.aspx with Department and Employee menu. Once you click on ‘Department’ menu, Departments.aspx will be displayed. Now click on any Department and you will be transferred to ‘DepartmentDetails.aspx’ as below:

The QueryString has the DeptNo and based upon the value of the DeptNo, the DetailsView will display the  Department details. Here you can now test the Update and New (insert) functionality.

Check out the second part of this article ASP.NET 4.5: Filtering using Model Binding in ASP.NET Web Forms

Conclusion: The Model binding feature provides facility to the developers to develop Webforms which can be independent from the Model


ASP.NET Hosting :: How to Connect to ASP.NET Using MySQL 5.0 - Part II

clock November 8, 2011 05:56 by author darwin

Please stay focus in the first part of this article. In this article, we will focus on taking advantage of the new support for stored procedures in MySQL 5.0. We will be building upon the example application created in Part 1, so please refer to the scripts in the previous article if you wish to create the sample database and ASP.NET application.

MySQL Stored Procedures

A stored procedure is made up of one or more SQL statements or commands and is stored within the database. Stored procedures can be used to perform any type of database operation such as retrieving one or more rows, inserting, updating, deleting data, or perhaps multiple database operations at once.


Before moving on, let’s take a look at creating a stored procedure. Launch MySQL Query Browser, connect to your versedb database, open a new Script Tab, and execute the following script.

DELIMITER $$

DROP PROCEDURE IF EXISTS `versedb`.`usp_Verse_GetList`$$
CREATE PROCEDURE `usp_Verse_GetList`()
BEGIN
  SELECT  verse_id,
          verse_text,
          verse_ref
  FROM    verse
  ORDER BY
          verse_ref DESC;
END$$

DELIMITER ;


This simple stored procedure retrieves all the rows in the verse table ordered by verse reference in descending order. To see this stored procedure in action, open a new Query Tab and execute the following command. 

CALL usp_Verse_GetList(); 

What you should see (assuming you have data in your verse table from Part 1), is a list of all the rows in your table ordered by the verse reference in descending order, just as you might expect.

One of the primary benefits of using stored procedures is that SQL statements and logic can be maintained apart from the applications that use them. So, instead of embedding SQL commands in your application, your application only needs to know how to execute the stored procedures it needs.

Stored procedures also support parameters. In this way, a single stored procedure can be used in many scenarios without having to be modified. For example, you can create a stored procedure that can retrieve a single row in your table based upon a primary key value passed as a parameter.

DELIMITER $$

DROP PROCEDURE IF EXISTS `versedb`.`usp_Verse_Get_By_Id`$$
CREATE PROCEDURE `usp_Verse_Get_By_Id`(v_id INT)
BEGIN
  SELECT  verse_id,
          verse_text,
          verse_ref
  FROM    verse
  WHERE   verse_id = v_id;
END$$


To see the stored procedure in action, execute the following command.

CALL usp_Verse_Get_By_Id(2);

What you should see is a single row returned from the database where the verse_id field is equal to 2. To retrieve a different row, you would simply replace the value 2 with a different valid primary key value. If you specify a value that does not exist in the table, then no rows would be returned.

A couple more things to mention: it is possible to define output parameters as well as for input, and stored procedures do not have to return any rows. We will look at an example of both in a later article, but imagine the scenario of creating a stored procedure to insert a new row into a table. You might pass the values for the row as input parameters, return the new primary key ID assigned to the inserted row as an output parameter, and would not need to return any rows of data.

Calling MySQL Stored Procedures from ASP.NET


Executing a stored procedure using ASP.NET is nearly identical to executing straight SQL. Unless a procedure requires parameters, you only need to provide the name of the stored procedure in the command text, and specify the CommandType property is of type StoredProcedure

// Get the MySQL connection string stored in the Web.config
string cnnString = ConfigurationSettings.AppSettings["ConnectionString"];

// Create a connection object and data adapter
MySqlConnection cnx = new MySqlConnection(cnnString);
MySqlDataAdapter adapter = new MySqlDataAdapter();

// Create a SQL command object
string cmdText = "usp_Verse_GetList";
MySqlCommand cmd = new MySqlCommand(cmdText, cnx);

// Set the command type to StoredProcedure
cmd.CommandType = CommandType.StoredProcedure;

// Create and fill a DataSet
DataSet ds = new DataSet();
adapter.SelectCommand = cmd;
adapter.Fill(ds);

One difference you might notice from the previous article is retrieving the connection string from the web.config using ConfigurationSettings.AppSettings
, which is typically best practice. If you are not familiar with this technique, you would simply create an block in your web.config that looks like the following

<appsettings>
  <add key="ConnectionString" value="Server=localhost;Port=3306;Database=versedb;Uid=root;Pwd=mySecret" />
  </add>
</appsettings>


You would need to add the section directly after and before. If you already have an section defined, you only need to insert the node for the connection string.

Executing Stored Procedures with Parameters

To execute a stored procedure with parameters, you must create and add a
MySqlParameter object to the MySqlCommand.Parameters collection for each required parameter.  Also, parameter names in MySQL use a prefix of "?" which is similar to Microsoft SQL Server's use of "@."


// Hard-coding the Verse ID for example only
int verseID = 2;

// ...Code to create connection goes here...

// Create a SQL command object
string cmdText = "usp_Verse_Get_By_Id";
MySqlCommand cmd = new MySqlCommand(cmdText, cnx);

// Set the command type to StoredProcedure
cmd.CommandType = CommandType.StoredProcedure;

// Create the verse ID parameter
MySqlParameter param;
param = new MySqlParameter("?v_id", MySqlDbType.Int32);
param.Value = verseID;
param.Direction = ParameterDirection.Input;
cmd.Parameters.Add(param);

// ...Code to build DataSet goes here...


Of course, you would probably wrap all of this code in a method that takes a verseID as a parameter and returns a DataSet or DataRow

Summary

In summary, you might think of stored procedures as a public method exposed by your database that encapsulates your SQL code. You can make any change to the stored procedure’s code, and as long as the name of the procedure and its parameters, if any, do not change (in other words, the “method signature” to continue our illustration), there would be no need to modify your ASP.NET application.

Hopefully this gives you a starting point for using MySQL stored procedures.  However, we have only begun to scratch the surface of this very powerful feature.  In the future, we will look at creating more complex stored procedures, and using stored procedures to insert, update, and delete data in your database.


ASP.NET Hosting :: How to Connect to ASP.NET Using MySQL 5.0 - Part I

clock November 8, 2011 05:31 by author darwin

In this series of articles, I want to introduce you to using MySQL 5.0 with ASP.NET.  I hope to cover the most common uses for MySQL, as well as take advantage of some of the new features in version 5.0.  To do this, we will look at creating a database of Bible verses and ASP.NET pages to view and manage the verses.

To begin development, you will need to have the following tools. 

Required Components:

-
.NET Framework 1.0 or higher

-
MySQL 5.0 database server
-
MySQL Connector/Net 1.0.6 or higher

Optional Components:

-
MySQL Query Browser 1.1.15 or higher
-
MySQL Administrator 1.1 or higher
-
Visual Studio 2002 or higher

MySQL database server comes with command-line utilities to administer and develop MySQL.  However, MySQL Query Browser and MySQL Administrator are great utilities that will make your life much easier.  Visual Studio is not required, but certainly makes developing ASP.NET applications much easier.  Alternatively, you can use the free ASP.NET Web Matrix or simply create your ASP.NET web pages using any text editor. 

Installing each of these components is outside the scope of this article.  Please refer to the documentation provided with each for installation and configuration instructions.

Setting up the Database

Here are the scripts you’ll need to create the verse schema (database).  To execute the scripts, you’ll need to use the mysql command line utility or MySQL Query Browser application.

CREATE DATABASE versedb;
CREATE TABLE `verse` (
  `verse_id` int(10) unsigned NOT NULL auto_increment,
  `verse_text` varchar(1024) NOT NULL default '',
  `verse_ref` varchar(50) NOT NULL default '',
  PRIMARY KEY  (`verse_id`)
)


As you can see, we are going to work with just a single table named verse to start with.  Before we can get data out of MySQL, obviously we have to put some data in.  Use the following scripts to add two verses to the table.

INSERT INTO `verse` (`verse_text`,`verse_ref`) VALUES
  ('And God is able to make all grace abound to you, so that in all things
  at all times, having all that you need, you will abound in every good work.',
  '2 Corinthians 9:8'),
  ('Whatever you do, work at it with all your heart, as working for the
  Lord, not for men, since you know that you will receive an inheritance from
  the Lord as a reward. It is the Lord Christ you are serving.',
  'Colossians 3:23-24');


Setting Up the Web Site

This article assumes you will set up a virtual directory on your local computer or you will upload the examples to a Web host that supports ASP.NET.  Setting up the test web site locally is outside the scope of this document.  If you plan to develop and debug ASP.NET on your local computer and are not already familiar with setting up Internet Information Server (IIS) or creating virtual directories, you can use the links provided on the Online Resources page to find tutorials that cover this subject.

Connecting to MySQL from ASP.NET

As mentioned before, you will need to download and install the MySQL Connector/Net ADO.NET library.  Once you’ve added the MySql.Data.dll assembly as a reference to your project or placed it in your /bin folder, you are ready to start writing code to access MySQL.  Here is an example of connecting to MySQL and retrieving all of the rows from the verse table into a DataSet.

// Connection string for a typical local MySQL installation
string cnnString =
"Server=localhost;Port=3306;Database=versedb;Uid=root;Pwd=MySecretPassword";

// Create a connection object and data adapter
MySqlConnection cnx = new MySqlConnection(cnnString);
MySqlDataAdapter adapter = new MySqlDataAdapter();

// Create a SQL command object
string cmdText = "SELECT * FROM verse";
MySqlCommand cmd = new MySqlCommand(cmdText, cnx);

// Create a fill a Dataset
DataSet ds = new DataSet();
adapter.SelectCommand = cmd;
adapter.Fill(ds);

// Bind the DataSet
// ... Place your databinding code here ...

If you’re already accustomed to data binding in .NET, you should immediately recognize the similarities.  The only difference is you use the MySqlXxx classes instead of the OleDbXxx or SqlXxx classes. 


Hello World…

The following code provides a simple yet complete example of connecting to MySQL and displaying the data retrieved from the database.  To use this code, add a new Web Form (.aspx) to your ASP.NET project, copy and paste, change the connection string to match your MySQL database user name and password, and save.

<%@ Page language="c#" %>
<%@ Import Namespace="System.Data" %>
<%@ Import Namespace="MySql.Data.MySqlClient" %>
<html>
<head>
<script runat="server" type="text/javascript">
void Page_Load(object sender, EventArgs e)
{
  if (!IsPostBack)
  {
    BindVerses();
  }
}

private void BindVerses()
{
  try
  {
    // Connection string for a typical local MySQL installation
    string cnnString =
"Server=localhost;Port=3306;Database=versedb;Uid=root;Pwd=myPassword";

    // Create a connection object and data adapter
    MySqlConnection cnx = new MySqlConnection(cnnString);
    MySqlDataAdapter adapter = new MySqlDataAdapter();

    // Create a SQL command object
    string cmdText = "SELECT * FROM verse";
    MySqlCommand cmd = new MySqlCommand(cmdText, cnx);

    // Create a fill a Dataset
    DataSet ds = new DataSet();
    adapter.SelectCommand = cmd;
    adapter.Fill(ds);

    // Bind the DataSet
    VerseRepeater.DataSource = ds;
    VerseRepeater.DataBind();
  }
  catch (Exception ex)
  {
    lblError.Text = ex.Message;
  }
}
</script>

<title></title>    
<style type="text/css">
  body { font-family:Verdana, Arial, Sans-Serif; font-size:small; }
  h1, h2, h3, h4, h5 { font-family:Trebuchet MS, Verdana, Arial, Sans-Serif;
}
  input, textarea { font-family: Verdana, Arial, Sans-Serif; font-size:small;
}
  .Error { font-weight:bold; color:#c00; }
  .VerseList { width:400px; }
  .VerseHeader {
    padding:5px;
    border:1px solid #999;
    background-color:#ddd;
    font-weight:bold;
  }
  .VerseText {
    font-family: Trebuchet MS, Verdana, Arial;
    font-size: small;
    padding:5px 5px 0px 5px;
    border-left:1px solid #999;
    border-right: 1px solid #999;
  }
  .VerseRef {
    font-family: Arial, sans-serif;
    font-style:italic;
    font-size: x-small;
    text-align:right;
    padding:5px 15px 0px 5px;
    border-left:1px solid #999;
    border-right: 1px solid #999;
    border-bottom:1px solid #ccc;
  }
  .VerseFooter {
    border-left:1px solid #999;
    border-right: 1px solid #999;
    border-bottom:1px solid #999;
}
</style>
</head>
<body>

  <form runat="server" method="post" id="Form1">
    <p><asp:label cssclass="Error" enableviewstate="False" runat="server"
id="lblError"></asp:label></p>
    <div class="VerseList">
      <asp:repeater runat="server" id="VerseRepeater">
        <headertemplate>
          <div class="VerseHeader">Verse List</div>
        </headertemplate>
      
        <itemtemplate>
          <div class="VerseText"><%# DataBinder.Eval(Container.DataItem, "verse_text") %></div>
          <div class="VerseRef">--
            <%# DataBinder.Eval(Container.DataItem, "verse_ref") %>
          </div>
        </itemtemplate>
        <footertemplate>
          <div class="VerseFooter"><img width="1" height="2" alt="" src="images/pixel.gif" /></div>
        </footertemplate>
      </asp:repeater>
    
    </div>
  </form>
</body>
</html>


ASP.NET Hosting :: Tips Using ASP.NET Session

clock November 1, 2011 07:00 by author darwin

While working with ASP.NET web application you must be familiar with one of most important state management technique “Session”. ASP.NET Session State is on by default, hence you are paying for memory even if you don’t use it. There are several ways to optimize it.

Tip #1 :  Not using Session State at all ? Then turn it off completely in web.config


Tip #2 : Session is only required for few pages not all over the application 

Then first turn it off for all pages, for that you need to do following entry in web.config


then enable it for a specific page where you required the session


Tip #3 : If you are using Session for Reading Purpose, use Session State as “ReadOnly”

If you are a beginner, you must be wondering what is EnableSessionState=”Readonly” .  Well, if you look at your web application, not all the pages using Session or some of the pages is using session data for reading purpose. If there is no write operation happaning on session, then it’s always better to use session State is “ReadOnly


The session request pass through different httpModule with in HTTPPipeline. Know more details on how session state ReadOnly works , please read the article
Read Only Session State in ASP.NET. A quick summary from the referred article,

The session state module implements a readers – writers  locking mechanism and queues the access to session state values. A page that has session-state write access will hold a writer lock on the session until the request finishes. A page gains write access to the session state by setting the EnableSessionState attribute on the @Page directive to True. A page that has session-state read access — for example, when the EnableSessionState attribute is set to ReadOnly — will hold a reader lock on the session until the request finishes.

You can also set ReadOnly SessionState in web.config as well


Tip #4 : Programmatically Change Session State Behavior when required (ASP.NET 4.0)

We can enable or disabled session state either in web.config or using @Page directive’s   EnableSessionState attributes. But there was no provision to change the session state at runtime till date in ASP.NET. But using  ASP.NET 4.0, we can change the session  state programmatically . The .NET 4.0 framework adds a new method SetSessionStateBehavior  to the HttpContext class for ASP.NET. This method required SessionStatebehavior  value to set the current session mode. To call SetSessionStateBehavior   simply create a new HttpModule by Implementing IHttModule and hook the BeginRequest event. Most important you can only use the SetSessionStateBehavior  until the AcquireRequestState event is fired, because
AcquireRequestState  Occurs when ASP.NET acquires the current state  that is associated with the current request

While calling SetSessionStatebehavior, You can pass the following values as SessionStatebehavior  :

- Default: This is default setting which means  everything works as before
- Disabled: Turned of Session Sate for Current Request.
- ReadOnly: Read only access to Session State;
- Required: Enabled session state for both Read and Write Access


Tip #5 : Compress Session Data while using OutProc Session mode based on Requirements (AP.NET 4.0)

ASP.NET 4.0 comes with a new option for compressing the Session data with Out Process Session mode. To enabling this functionality we need to add “compressionEnabled=”true” attribute with the SessionMode in web.config .


When Compression mode is enabled is web.config, ASP.NET  compress the serialized session data  and passed it to session storage and during retrieval same  deserialization and decompression happens in server side. ASP.NET 4.0 used System.IO.Compression.GZStream class to compress the session mode.


Tip #6 : Use HttpContext.Current.Items for very short term storage instead of Session

You can use HttpContext.Current.Items for very short term storage. By Short term storage means, this data is valid for a single HTTP Request.  There are many confusion around regarding storing data in HttpContext.Current.Items and storing data in Session variable. Items collections of HttpContext is and IDictionary key-value collections and that are shared across a single HTTPRequest. Yes, HttpContext.Current.Items  valid for  a single HTTPRequest.


Cheers…


ASP.NET 4.5 Hosting :: Bundling and Minification EXPLAINED!

clock October 11, 2011 06:17 by author Administrator

Optimizing application performance  is a key element for business. There are several ways by which we can optimize the applications performance. It can be done either by server side code optimization, caching or some client side optimization. In this post I am going to discuss about one handy and smart way to optimize web applications performance using Bundling and Minification  features which is introduced with ASP.NET 4.5 Developer Preview. ASP.NET 4.5 Developer Preview introduced bundling, which combines multiple JavaScript files for faster loading with less number of requests for download and minification, which reduces the size of JavaScript and CSS files by removing unneeded characters .  Combination of these bundling and minification helps web pages to load very faster. Let’s have a looks how it works.

The below images shows the typical web application structure of  that contains CSS and Javascript files along with other asp.net elements

Scripts folder contains all the JavaScript files where as Styles contains all the CSS file. CSS  and JS files takes milliseconds of time  to load into the browser though it’s really matter how much time it’s takes to load the CSS and JS files.


This is how you refer the JavaScript and CSS in applications markup


Run your application and  inspect the loaded Css and JavaScript files using IE Developer toolbar . You can see all the mentioned css and JavaScript in the html markup  loaded individually


To take a more granular look on the loading perspective, you can use the IE Developer toolbar. You will find there are individual request to download the css and javascript files and each of them taken individual time

You can take a quick look using YSlow statistics viewer for total number of request for javascript and css files

ASP.NET 4.5 Introduced Bundling and Minifying the files which reduce the number of requests by merging the files into a single one. Bundling combines multiple JavaScript files for faster loading and reduced the number of request to download the files and minification reduces the size of JavaScript and CSS files by removing unneeded characters.

To apply the binding and  Minifying first of all you need to refer the folder for css and javascript instead of individual files. Along with the folder name you have the append css for CSS folder and js for JavaScript folder.


That’s all. Run the application once again and inspect the save thing for CSS and JavaScript in IE Developer Toolbar. Interestingly you will find only one CSS File and one JavaScript has been loaded


You can also use IE Developer toolbar to checkout the result. Yes, there is only two request, one for CSS and another for JavaScript. You can also find the significant amount of changes in file size and number of request for JS and CSS file also reduced


.NET 4.5 introduced a new class called BundleTable provides programmatic access to the collection of registered Bundle objects in an ASP.NET application. Bundle object  contains the  list of JavaScript or CSS files . ASP.NET runtime dynamically combines into a single virtual file that a browser can retrieve by using a single request


Every elements of Bundle object is a key value pair . Key is a string that define either “JS” or “Css” and Values contains the the type of  System.Web.Optimization.DynamicFolderBundle


You can create your custom bundles for JavaScript  as well as CSS.  Below code snippets shows the same

Once you have your own bundle object, you can specify the same in your html markup as shown in below


Now, run the application and inspect your own created bundle in IE Developer toolbar


One of the biggest advantages of this custom bundle objects is, you can refer multiple directories as shown in below code snippet

As shown in above code snippet, we are adding one directory for bundling with filtering criteria  of  “.JS” file. Boolean values indicate while adding the directory, it will ignore the sub directories


ASP.NET 4.0 & ASP.NET 4.5 Hosting


ASPHostCentral is a premier web hosting company where you will find low cost and reliable web hosting. We have supported the latest ASP.NET 4.5 hosting and ASP.NET MVC 4 hosting. We have supported the latest SQL Server 2012 Hosting and Windows Server 2012 Hosting too!


Calendar

<<  September 2024  >>
MoTuWeThFrSaSu
2627282930311
2345678
9101112131415
16171819202122
23242526272829
30123456

View posts in large calendar

Sign in