ASP.NET 4.0 Hosting & ASP.NET 4.5 Hosting BLOG

BLOG about ASP.NET 4.5 Hosting, ASP.NET 4.0 Hosting and .NET 4.5 Framework and its Capabilities

IIS 7.5 Hosting :: Security Model for ASP.NET

clock May 3, 2011 08:00 by author Administrator


IIS has its own security configuration and even for any request reaching the ASP.NET runtime, IIS verifies the request with it's own security configuration. So the first gatekeeper in the ASP.NET security pipeline is actually IIS. So let us understand those security mechanisms which IIS implements:

1. Authentication: IIS support following authentication mechanism

- Basic authentication
- Digest authentication
- Passport authentication
- Window authentication
- Certificate authentication

Point to remember:

- Any authentication which IIS performs results into an authenticated window user, so this means that IIS supports authenticating window users only.
- If ASP.NET is configured to support form or window authentication, then configure IIS to support basic or digest authentication.
- If ASP.NET is configured to support form or custom authentication, then configure IIS to support anonymous access.
- With XP, it comes with IIS 5.x
- With Server 2003, it is IIS 6.0

How to configure IIS for authentication
:

Point to member here:

1. When the Anonymous User option is checked then everyone is given access to a web page and it overrides all authentication settings.

2. If IIS is configured to anonymous authentication, we can still use ASP.NET-based security to authenticate users either with ASP.NET-integrated mechanisms such as forms authentication or a custom type of authentication.


3. Windows authentication configures IIS to validate the credentials of the user against a Windows account configured either on the local machine or within the domain. A Credential submitted by a user is verified against the Windows account.

4. When Basic Authentication is checked it defines an additional HTTP header for transmitting user names and password across the wire but nothing is encrypted here. It is transmitted in the form of a base64 encoding.


5. Digest authentication is similar to basic authentication with the difference that instead of sending credentials in the form of Base64 encoding, user password and username are hashed.


LightSwitch Hosting :: How to Publish LightSwitch Beta 1 Application

clock April 5, 2011 07:46 by author Administrator

Publishing a LightSwitch Beta 1 Application

Here is the official documentation on how to publish a LightSwitch application - How to: Deploy a LightSwitch Application. For this example, I'm going to show how to deploy a simple application that does not have any role-based security set up. I'll show how we can configure that in a later post.

So back over on my LightSwitch development machine the first thing we need to do is specify the type of 3-tier deployment we want. In the case of my application, I want it to be a Windows Desktop client because I'm doing some COM automation with Office and I want to run outside of the browser. To specify this, from the menu select Project—> AppName Properties and then select the Application Type tab to choose the type of 3-tier deployment you want.  

Next, from the main menu select Build –> Publish AppName to open the LightSwitch Publish Application Wizard. Verify the deployment is 3-tier and then click next to get past the Welcome page. In the Publish Output section you select whether you want to remotely publish to the server or just create a package on disk. If you have installed the Web Deployment Tool on your server (which is automatically installed if you installed the LightSwith Prerequisites above) then you can choose to deploy the application directly to your server by selecting “Remotely publish to a server now”. (UPDATE: To see how to remotely publish see this post.)

NOTE: In Beta 1 you can only do remote publishing to a Windows 2008 server running IIS 7 at this time. The team has added support for IIS 6 and Windows 7 and will be available in the next refresh.

For this example I'm going to show how to create and install the package manually so select "Create a package on disk" and then enter LightSwitchTest for the website name and specify a location to where you want the package created. Then click Next.

On the next page you specify the Database Configuration details. You can either create a new database or specify a database that needs to be updated. This refers specifically to the intrinsic database that is maintained by every LightSwitch application and exists regardless of whether you create new tables or attach to an existing database for your data. For the first deployment of the application you are always going to want to select the New Database option as you won't have one created yet.  If you are publishing an update to an existing application then you would select Update Existing option.

NOTE: Currently Beta 1 cannot update an existing database. This is a known bug and will be fixed in the next refresh. For now you will need to update the database manually if you make any schema changes and want to publish the update.

Next click Publish and this will create a .ZIP file package in the publish location you specified. Copy that application package over to your web server.

Installing the LightSwitch Application Package on the Server
Back on the web server, navigate to the C:\LightSwitchTest folder and delete the Default.htm file we created earlier for testing. Then open up IIS Manager and right-click on the Default Web Site and select Deploy –> Import Application.  

Browse to the .ZIP application package that we created then click Next, verify the virtual directory name and click Next. The contents of the package will be then be displayed.  

Click Next and enter the remaining database details – specifying .\SQLEXPRESS as the local SQL Express server name, and entering the SQL Server user name and password we created above.  

Click Next and this will kick off the installation that should be pretty quick. Once it completes you should be able to see your database in SQL Server Management Studio and all the web application files on disk.

Using Windows Integrated Security from the Web Application to the Database

Like I mentioned earlier, typically you want to set up Windows Integrated security between your web application and database. It's a lot easier this way because you don't have to worry about managing user names and passwords in a bunch of application connection strings. It also is a lot more secure -- right now our username and password to the database is being stored in clear text on the web application's Web.config.

Since we've configured our LightSwitchAppPool to run under the LightSwitchApp user identity we created earlier, we can change the connection string in the Web.config to use integrated security and the middle-tier will connect to the database under this windows account instead. In IIS Manager right-click on the LightSwitchTest web application and select Explore to navigate to the physical folder. Open the Web.config in notepad and remove the uid and password and add Integrated Security=SSPI:

<?xml version="1.0" encoding="utf-8"?>
<configuration>
  <appSettings>  ... </appSettings>
  <connectionStrings>
    <add name="_IntrinsicData" connectionString="Data
ource=.\SQLEXPRESS;Database=OMS;Integrated Security=SSPI;" />
  </connectionStrings>
  <system.web> ...

Save the file. The last thing to do is add access to the application database (in my case I named it OMS). Open up SQL Server Management Studio again, expand the Security –> Logins node in the Object Explorer and double-click on the LightSwitchApp windows login account we added earlier. The Login properties are displayed. Select the User Mapping page and check off the application database to allow access then under the database role membership check db_owner and click OK:

NOTE: These steps should not be necessary at RTM once we are allowed to specify integrated security when installing a LightSwitch application package.

Launching the LightSwitch Application

Now for the fun part! Head over to a networked machine and navigate your favorite browser to the site http://<servername>/LightSwitchTest and you should see a "Install Silverlight" graphic on the page if you don't have Silverlight installed. Install it then refresh the page and you will see the install page for your application:

Click the big blue "Install…" button and after a few seconds the application will launch out of browser and an application icon will be placed on the desktop. Woo hoo!

Now we have a 3-tier out-of-browser LightSwitch application deployed and running smooth.


ASP.NET 4.0 Hosting :: Questions on .NET 4 New GAC Locations/GacUtil

clock March 25, 2011 09:22 by author Administrator

This is what I know, let me know if you know otherwise.  There are now 2 distinct GAC locations that you have to manage as of the .NET 4 Framework release.

The GAC was split into two, one for each CLR (2.0, 3.5 AND 4.0).  The CLR version used for both .NET Framework 2.0 and .NET Framework 3.5 is CLR 2.0. To avoid issues between CLR 2.0 and CLR 4.0 , the GAC is now split into private GAC’s for each runtime.  The main change is that CLR v2.0 applications now cannot see CLR v4.0 assemblies in the GAC.

In previous .NET versions, when I installed a .NET assembly into the GAC (using gacutil.exe or even drag and drop to the c:\windows\assembly directory), I could find it in the ‘C:\Windows\assembly’ path.

With .NET 4.0, GAC is now located in the 'C:\Windows\Microsoft.NET\assembly’ path.

In order to install a dll to the .NET 4 GAC it is necessary to use the gacutil found C:\Program Files (x86)\Microsoft SDKs\Windows\v7.0A\Bin\GacUtil.exe  In addition, you can no longer use the drag n' drop (in reality the drag n' drop really executed the gacutil via a windows explorer extension).

After you use the gacutil.exe -i {path to dll} you can view that it is indeed in the gac via gacutil -l (which will list all dlls in the gac).  I used this command and piped the results to a text file via > out.txt which made it easier to find the recently added component.

I was not able to see my gac object in the directory for .net 4 (i.e. c:\windows\microsoft.net\assembly path).  I am not sure why just yet.  Ideas?

At this point, the object is in the local gac however if you are using vs.net 2010 it will still not show up in the list of references. To get the component to show up in the VS.NET list of references can add a registry entry to HKLM\SOFTWARE\WOW6432Node\Microsoft\.NETFramework\v4.0.30319\AssemblyFoldersEx  At this point, the component is in the local GAC and is in the list of references to be used by vs.net.

Note, I did find that if I just added the path to the registry without adding it to the gac it was available to vs.net.  So, because the component is listed via vs.net add references it does not necessarily mean it is in the gac.

What still confuses me is that I am still unable to view my recently added component in the .NET 4 directories above.  Ideas?


WCF Hosting :: Differences Between ASP.NET Web Service and WCF Service

clock March 22, 2011 07:51 by author Administrator

WCF/ASP.Net Web Services are used for developing web services. Here is a list of differentiation between these two.

Feature

ASP.NET Web Service

WCF

Data Transformation

To and from Data Transition is done through XML Serializer

DataContractSerializer is used for data transition

File Extension

File extension is asmx

File extension is .svc

Webmethods vs    DataContract Attributes

ASP.NET WebService uses Webmethods to translate .NET FW types in to XML.</SPAN< td>

The WCF uses the DataContractAttribute and DataMemeberAttribute to translate .NET FW types in to XML.

Limitations

Only Public fields or Properties of .NET types can be translated into XML.Only the classes which implement IEnumerable interface. ICollection interface can be serializable

Public/Private fields or properties of .NET types can be translated.

IDictionary Interface  class

Classes that implement the IDictionary interface, such as Hash table can not be serialized.

The DataContractSerializer can translate the Hash Table into XML. Hence using WCF we can even translate HashTable into XML

Security

WCF is more secured than WebService due to ->

It is based on WS Standards. capable to run in any .NET executable, so it needs independent security capabilities.

Transfer security  Responsible for providing message confidentiality, data integrity, and authentication of communicating parties.
Authorization Responsible for providing a framework for making authorization decisions.
Auditing Responsible for logging security-related events to the audit log

Binding

Web service supports only HTTP.

WCF supports multiple bindings HTTP,TCP,MSMQ,WS-HTTP etc

Messaging

ASP.Net web service uses only SOAP (Simple Object Access Protocol) for sending and receiving data. It uses Xml Schema  to  defines structure of message.

Windows Communication Foundation (WCF) can send message in any format. It uses SOAP for communication by default. It can use any other transport protocol for message transport .

Performance

Slower compared to WCF

The main advantage of the design of the DataContractSerializer is better performance over XML serialization

Fields / Properties

XMLSerialization does not indicate the which fields or properties of the type are serialized into XML

DataContratSerializer Explicitly shows the which fields or properties are serialized into XML

Exception handling

In ASP.NET Web services, Unhandled exceptions are returned to the client as SOAP faults.

In WCF Services, unhandled exceptions are not returned to clients as SOAP faults. A configuration setting is provided to have the unhandled exceptions returned to clients for the purpose of debugging.

Example

[WebService]
public class Service : System.Web.Services.WebService
{
[WebMethod]
public string Demo(string strDemog)
{
return strDemo;
}
}

[ServiceContract]
public interface ITest
{
[OperationContract]
string ShowMessage(string strDemo);
}
public class Service : ITest
{
public string Demo(string strDemo)
{
return strDemo;
}
}


WebMatrix Hosting with ASPHostCentral.com

clock February 11, 2011 08:15 by author Administrator

ASPHostCentral.com offers the latest WebMatrix based hosting service to all our new and existing customers. This application is pre-installed on the server and it allows you to install several world-class favorites application, such as DotNetNuke, nopCommerce, etc.   

You can always start with our Standard Plan (from @$4.49/month) to have WebMatrix based applications installed on your site. Should your requirement changes in the future, you can always request for an upgrade without causing any downtime. Remember, everything is just one-click away from your mouse! So, why wait longer? Please register your interest here.

What is WebMatrix?
WebMatrix is a bundle of software running on the developer's machine, with the aim of simplifying the process of web application development using Windows. The bundle includes the IIS Express web server, the SQL Server Compact database engine and the ASP.NET Web Pages framework. The ASP.NET Web Pages framework contains the 'Razor' syntax for inline coding of C# and VB within HTML. WebMatrix also integrates the Web Application Gallery and Web Application Installer from Microsoft, enabling developers who use PHP, MySQL or other web development components to download, install and configure these components directly from WebMatrix   

Create, Customise and Publish websites with WebMatrix
WebMatrix is a brand new web development tool from Microsoft that includes everything you need for website development. Start from open source web applications, built-in web templates or just start writing code yourself. It’s all-inclusive, simple and best of all free. Developing websites has never been easier.   

Create your website
To get started creating websites, just download and install WebMatrix using the Microsoft Web Platform Installer. You’ll be up and running less than 5 minutes! Once WebMatrix is installed, we make it simple to get and install the latest version of your favorite free web applications such as WordPress, Joomla!, DotNetNuke and Orchard.   

Customise your website
Once you’re up and running, you will find that WebMatrix provides all the tools features you’ll need in a single unified interface. Say good-bye to switching between multiple applications just to perform common web development tasks. With WebMatrix, you’re always just a click away from easily editing your files, managing your database and modifying your server settings.   

Publish your website
When you’re ready, WebMatrix provides a no-hassle way to show the world your website. Just access our hosting gallery from WebMatrix and you’ll find a hosting provider that is guaranteed to run your site smoothly while also allowing you to publish directly from WebMatrix


.NET Hosting :: Working with GMail SMTP Server to send Email

clock January 27, 2011 05:28 by author Administrator

So you (or your client) moved your email to Google Apps and now you want to use Google SMTP server to send emails from ASP.NET ? It is pretty straight forward. Read on…

The System.Net contains the class SmtpClient which can be used to send the email from your ASP.NET page. Let us jump in the code (C#)

SmtpClient mailSender = new SmtpClient(“smtp.gmail.com”);

You can pass the smtp server location in the SmtpClient class’ constructor.

Next specify the port:
mailSender.Port = 587;

You can send the email using Google’s SMTP only by using authentication. So we will need to send the user name and password for the account from which you want to send the email (i.e your “From” email address):

System.Net.NetworkCredential credentials = new System.Net.NetworkCredential(emailUserName, emailPassword);

where emailUserName is obviously your email address and emailPassword its password. Next use these credentials to send the email :

mailSender.Credentials = credentials ;

Next tell the SMTP server NOT to use the default credentials and to use SSL

mailSender.EnableSsl = true;
mailSender.UseDefaultCredentials = false;

Now send the email as you would normally in ASP.NET:

MailAddress toAddress = new MailAddress(“[email protected]”);
MailAddress fromAddress = new MailAddress(“[email protected]”);
MailMessage message= new MailMessage(fromAddress , toAddress );
message.Subject = “Email Subject”;
message.Body = “Email Message”;
mailSender .Send(message);

Of course as always recommend putting the smtp client (“smtp.gmail.com”) , port number. emailUserName and emailPassword in some kind of configuration (ASP.NET web.config file, app.config , SQL Server database etc)

This means you need to know the email user name and password of the account that the email is sent from. I have not found any other solution than physically creating this email account and using it. If anyone has found a better solution for this, please let me know


ASP.NET MVC 3 Hosting :: Working with ASP.Net MVC 3 Razor View Engine and Syntax Highlighting

clock January 26, 2011 05:39 by author Administrator

Today, we found a good answer on syntax highlighting for Razor. In the Visual Studio Gallery located at http://visualstudiogallery.msdn.microsoft.com/en-us/8dc77b9c-7c83-4392-9c46-fd15f3927a2e, a new Visual Studio extension has been recently added for a “Razor Syntax Highlighter”.


To leverage this new extension, we had to remove the editor mapping for .cshtml files in the Visual Studio Text Editor/File Extensions window and install the highlighter extension. As you see in the figure below, it worked great. This new extension uses the Razor Parser libraries to appropriately highlight the Razor code.


Figure 1 - Syntax Highlighting Visual studio 2010 Add-on

Unfortunately, this feature is offered as a Visual Studio Extension and hence is only available for paid-for Visual Studio 2010 editions.

Looking at the Razor Syntax, one can summarize it as a means to short-hand the <%= %> used in ASPX pages to designate code sections. For Razor, only a simple @ sign is used in-place of that bulky aforementioned code markup . Additionally, the Razor parser introduces helpful intelligence that makes the syntax even more user-friendly. For instance the following is a code block you would see in an ASPX page:

<%=if(true){%>
       <input type="hidden" value="istrue"/>
<%}%>  

The corresponding Razor block for this snippet would be:

@if(true){
       <input type="hidden" value="istrue"/>
}

The Razor syntax has simply “inferred” that the code will have a closing curly bracket without us having to apply any special markup tags to it. This further reduces the markup needed to accomplish the same task.

An important difference between Razor and ASPX View Engines is the absence of master pages for the earlier. Razor simply provides a _ViewStart.cshtml to bootstrap our application layout.

@{
    Layout = "~/Views/Shared/_Layout.cshtml";
}

Latest Razor Beta does however support Partial rendering (RenderPartial) to explicitly render a Partial View as well as calling @RenderBody() which loads the actual view content to be served.

Next, we will be talking about creating an MVC project with dual support for ASPX/Razor View Engines as well as further explore the Razor syntax.


ASP.NET MVC 3 Hosting :: Working with ASP.Net MVC 3 Razor View Engine and Syntax Highlighting

clock January 26, 2011 05:39 by author Administrator

Today, we found a good answer on syntax highlighting for Razor. In the Visual Studio Gallery located at http://visualstudiogallery.msdn.microsoft.com/en-us/8dc77b9c-7c83-4392-9c46-fd15f3927a2e, a new Visual Studio extension has been recently added for a “Razor Syntax Highlighter”.

To leverage this new extension, we had to remove the editor mapping for .cshtml files in the Visual Studio Text Editor/File Extensions window and install the highlighter extension. As you see in the figure below, it worked great. This new extension uses the Razor Parser libraries to appropriately highlight the Razor code.


Figure 1 - Syntax Highlighting Visual studio 2010 Add-on

Unfortunately, this feature is offered as a Visual Studio Extension and hence is only available for paid-for Visual Studio 2010 editions.

Looking at the Razor Syntax, one can summarize it as a means to short-hand the <%= %> used in ASPX pages to designate code sections. For Razor, only a simple @ sign is used in-place of that bulky aforementioned code markup . Additionally, the Razor parser introduces helpful intelligence that makes the syntax even more user-friendly. For instance the following is a code block you would see in an ASPX page:

<%=if(true){%>
       <input type="hidden" value="istrue"/>
<%}%>  

The corresponding Razor block for this snippet would be:

@if(true){
       <input type="hidden" value="istrue"/>
}

The Razor syntax has simply “inferred” that the code will have a closing curly bracket without us having to apply any special markup tags to it. This further reduces the markup needed to accomplish the same task.

An important difference between Razor and ASPX View Engines is the absence of master pages for the earlier. Razor simply provides a _ViewStart.cshtml to bootstrap our application layout.

@{
    Layout = "~/Views/Shared/_Layout.cshtml";
}

Latest Razor Beta does however support Partial rendering (RenderPartial) to explicitly render a Partial View as well as calling @RenderBody() which loads the actual view content to be served.

Next, we will be talking about creating an MVC project with dual support for ASPX/Razor View Engines as well as further explore the Razor syntax.


ASP.NET 4.0 Hosting :: Working with Error Logging and Error Handling in ASP.NET 4.0

clock October 22, 2010 10:01 by author Administrator

Logging exceptions is important for controlling your application when they are deployed. You can opt for using one of the available libraries on the market or your own way of storing this information. Both sides have their own pros and cons. Using a third-party code lets you implement the task in less time.

Writing your own code is probably a win situation if you do not want to include reference to gigantic libraries in order to only use a small part of their features. Handling errors the right way is crucial from the security point of view: the less your attacker sees, the more secure your application. In this article, you will learn how to protect your error from others and, at the same time, log it for tracking purposes

Error logging with Enterprise Library and log4Net

If you decide to use custom libraries to handle logs, you will probably choose between Microsoft Enterprise Library and Apache Foundation log4net. Microsoft Enterprise Library, at the time of writing, is available in version 4.1 at http://msdn.microsoft.com/en-us/library/cc467894.aspx. This library is free and contains a lot of functionalities; logging is only a small part of it. It is diffused among enterprise applications because even though it is not part of the .NET Framework BCL, developers tend to trust external class libraries coming from Microsoft.log4net is a project from Apache Software Foundation and it is available under the Apache License at http://logging.apache.org/log4net/index.html.   

Both libraries provide great flexibility; you can log information (and errors) to a file, a database, a message queue, or the event log or just generate an e-mail.

If you are trying to choose one over the other, you have to consider these points:

- Enterprise Library has a GUI tool to configure its Logging Application Block
- log4net supports hierarchical log maintenance

The choice is based mainly on the features you need to address because, from the performance point of view, they are very similar.

Enterprise Library is often considered because of its capabilities so, if you are already using it in your project (for example, because of the Cache Application Block), you may find it very similar, and using it is the right move because you already have a dependency on the main library

On the other hand, log4net is preferred by developers searching.

only for a simple and very complete library to perform this task and nothing more

If you prefer to write code, however, and your logging needs are only related to exceptions, you'll probably find easier to just handle and store this information with your custom code


Intercepting and handling errors with a custom module


Exposing errors to end users is not a good idea from both the usability and the security point of view. Error handling implemented the right way will help the administrators to inspect the complete error and provide a courtesy page to the users.

Problem


We want to avoid full error disclosure to normal users and display the full error to the administrators. This will preserve security and help the administrators to inspect errors without accessing the error logging tool while they’re running the page causing the error. We want to provide also an entry point to add more powerful exception logging capabilities in the future

Solution


ASP.NET gives you control over errors, letting you choose from among three options:

- Always show the errors
- Never show the errors.
- Show the error only when the request is coming from the same machine running the application

The following code comes from a typical web.config and lists the options:


These settings are flexible enough to cover your needs while developing the application; the reality is that, when you put your application in production, you will probably not make requests from the same machine running the page and you need to be the only one accessing error details


It is very important to not show sensitive information to users: errors are considered very dangerous. HttpApplication has a useful Error event, used to intercept exceptions not blocked at a higher level, such as in a try/catch block. This event can be handled to combine authorization and authentication from ASP.NET so you can show the error only to a specific group of people, thanks to Roles API available on ASP.NET

The code is really simple: you just have to handle the event, verify user permissions given the current roles, and then show a personalized error page or just let ASP.NET do the magic, using the values specified in web.config

We need to configure web.config to register our module as in listing 1

Listing 1: The custom authorization module to modify the response flow
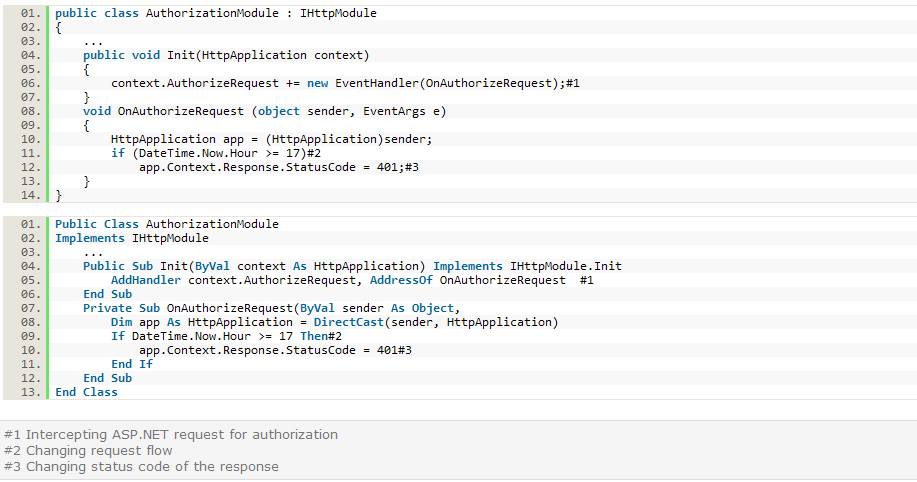


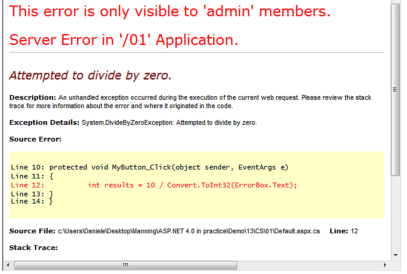
When an error occurs, the exception is handled by our event handler, and we will display an error message similar to the one in figure 1

Figure 1: Using our custom error system we can add further information to the error page or simply decide to show the error to given clients.


To implement such a personalized view, we need to write a custom HttpModule like the one in listing 2
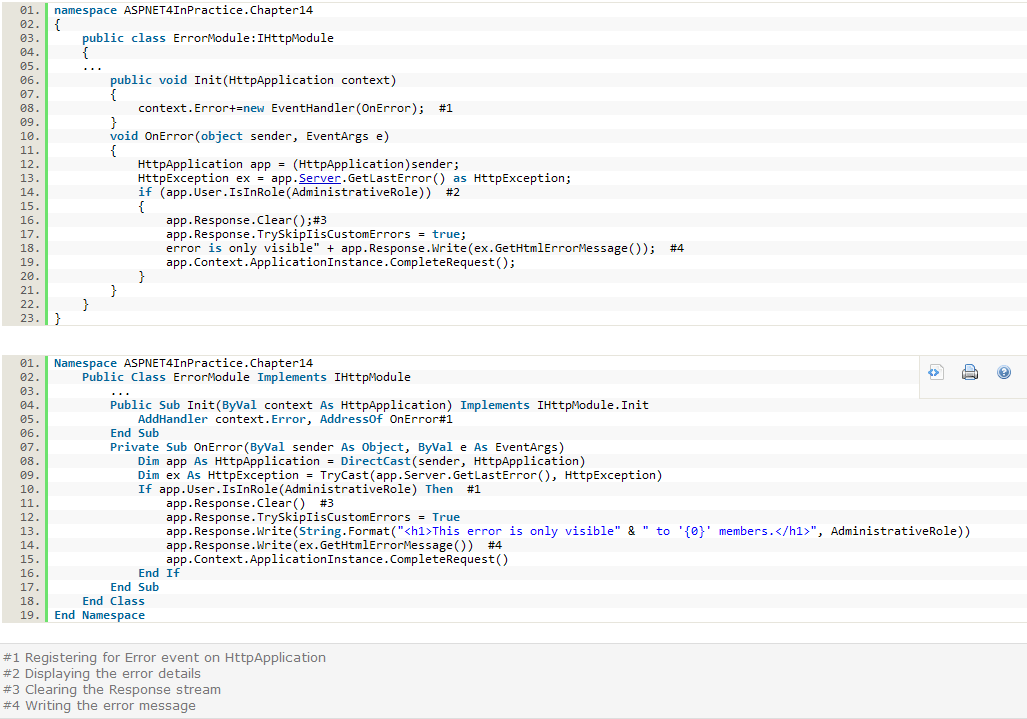


This code can be easily adapted to integrate further logging instrumentations, like form variables or application status. To register the module, you have to place this configuration in your web.config:

Error event handler is the right place to add your code. You can use MailMessage class from System.Net.Mail to compose a notification email
and send it to your address. If you want to use something that’s readily available, take a look at Health Monitoring in the MSDN documentation.

It is important to remark that TrySkipIisCustomErrors property from HttpResponse class is used to modify the default behavior of IIS 7.x when dealing with custom errors. By default, in fact, IIS 7 will bypass the local error handling and, instead, use the configuration applied in the system.webServer section. By setting this property, you can control IIS 7.x behavior too; the behavior of IIS 6.0 is not affected by this change

Discussion

HttpModules enable global event handling and are very useful in such a situation. This approach is very simple, centralized, and open to further improvements. It is also showing you how easy it is to tweak ASP.NET behavior and to avoid security concerns: the less an attacker sees the better it is for your application security. Error logging can be done with many different approaches. What we showed in these examples is a starting point. To meet your more complex needs, you can use the libraries we mentioned

Summary

Remember that ASP.NET is built with flexibility. This characteristic reflects how many incredible things you can do using extreme techniques. ASP.NET offers the right entry points to add your own custom mechanisms to implement simple things like logging errors. ASP.NET is so powerful that you can literally do anything you may need; you just have to write code and unleash your imagination!


Visual Studio 2010 Hosting :: Working with Visual Studio 2010 Parallels Stacks

clock September 30, 2010 04:35 by author Administrator

Parallel Stacks is one of the debugging enhancements in VS 2010 IDE that helps in debugging parallel programming. When you press F5 for debugging Parallel Stacks and Parallel Tasks windows get enabled in debug mode only. As you know, when a break point is set Program will stop at the Break Point

Debug Menu Item->Windows->Parallel Stacks


Parallel Stacks

The Parallel Stacks window demonstrates call stack information for all threads and Tasks


There is a dropdown list in the upper left-hand corner to select either Thread View or Task view


The below figure indicates parallel stacks in Tasks View


The below described are the other options

Show Only Flagged

There is Flagged Icon in the toolbar to show only call stacks for flagged threads. Flagging of the threads can be done from parallel tasks window

Toggle Method View

This help to toggle between Stack View and Method View

AutoScroll to current Stack Frame

As the name suggests this feature helps to auto-scroll the diagram to the current stack frame

Toggle Zoom Control

This feature is to show/hide the zoom control

Right click on the current thread in call stack window and you can see the options as shown below


We can Go to Source Code directly from here using Go to SourceCode Option. The other options are Go to Disassembly, Show External Code, Hexadecimal Display, Symbol Load Information, and Symbol Settings. The two new items that we get in addition to these are “Switch to Frame” and “Go to Task

“Switch to Frame” - switches to the frame that gets called in Call Stack window, but in a parallel application, there are cases that multiple frames may correspond to one method context. In that case there will be sub-menu items for each stack frame

“Go to Task”- switches to the Task view. We can also navigate the same using the dropdown list in the toolbar. But it keeps the stack frame that has clicked as highlighted


ASP.NET 4.0 & ASP.NET 4.5 Hosting


ASPHostCentral is a premier web hosting company where you will find low cost and reliable web hosting. We have supported the latest ASP.NET 4.5 hosting and ASP.NET MVC 4 hosting. We have supported the latest SQL Server 2012 Hosting and Windows Server 2012 Hosting too!


Calendar

<<  November 2024  >>
MoTuWeThFrSaSu
28293031123
45678910
11121314151617
18192021222324
2526272829301
2345678

View posts in large calendar

Sign in